
- As you can see this even this site on which I am writing my blogs is also powered on WordPress.
- It gives you a medium to write down your experiences as blogs and posts and lets other like, dislike, comment on your post and you can efficiently transform all this on mobile device too.
- Setting up WordPress on Linux servers is pretty easy and documented all over the Internet and you should not spend thousands on websites, if you can do that for free or almost free( counting on the cost for registering a domain name).
- Lets break down the task on how to setup all this:
- One, setup up the LAMP stack
- Two, setup up the WordPress website.
- Setting up the LAMP server :
- We will use CentOS 7 as the OS, but you can use any Linux Distro.
- The commands would be almost be same except on how to use the Installation managers ‘apt’ or ‘yum’ or on how to start services.
- I will highlight where ever needed.
- If you have not installed the OS, you can check my one the posts on how to install Linux.
- So lets start:
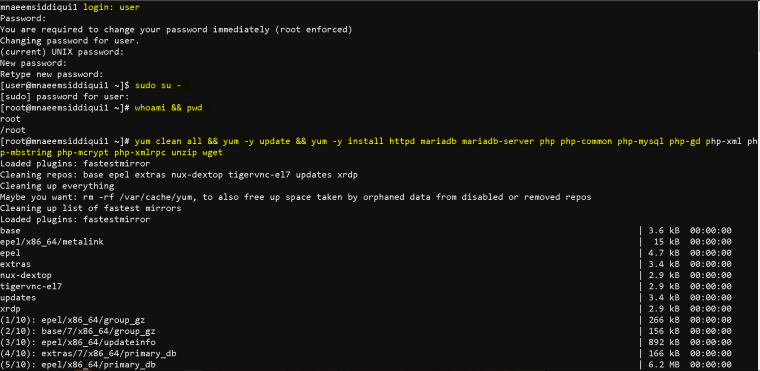
- Login to the server and elevate your rights to superuser/root – sudo su –
- Install the required software. You can install Apache, MariaDB, PHP all one by one or all together, I will explain both.
- First disable SELinux – setenforce 0
- Lets see all together – yum clean all && yum -y update && yum -y install httpd mariadb mariadb-server php php-common php-mysql php-gd php-xml php-mbstring php-mcrypt php-xmlrpc unzip wget firewalld
- If you have Ubuntu or an Debian Linux based distro, then use apt-get instead of yum and also some of the names will change e.g. httpd will be replaced by apache2
- apt-get clean all && apt-get -y update && apt-get -y install apache2 mysql mysql-server php php-common php-mysql php-gd php-xml php-mbstring php-mcrypt php-xmlrpc unzip wget
- You can do one by one installation-
- yum -y update – to update the server
- yum -y install httpd – to install Apache
- yum -y install mariadb mariadb-server – to install MySQL and its dependencies.
- yum -y install php php-common php-mysql php-gd php-xml php-mbstring php-mcrypt php-xmlrpc – to install PHP and related dependencies
- yum -y unzip curl wget firewalld – to install miscellaneous software.
- Now that we install required software, we need to start some services and enable them so that they are always execute on boot.
- Enable and start Apache –
- systemctl start httpd ( for Ubuntu based systems use – service apache2 start )
- systemctl enable httpd( for Ubuntu based systems use – service apache2 enable)
- Enable and start MySQL-
- systemctl start mariadb( for Ubuntu based systems use – service mysqld start)
- systemctl enable mariadb( for Ubuntu based systems use – service mysqld enable)
- Enable and start Firewall-
- systemctl start firewalld( for Ubuntu based systems use – service firewalld start )
- systemctl enable httpd( for Ubuntu based systems use – service firewalld enable)

- Enable Http and Https on the server
- firewall-cmd –permanent –zone=public –add-service=http
- firewall-cmd –permanent –zone=public –add-service=https
- firewall-cmd –reload
- systemctl restart httpd
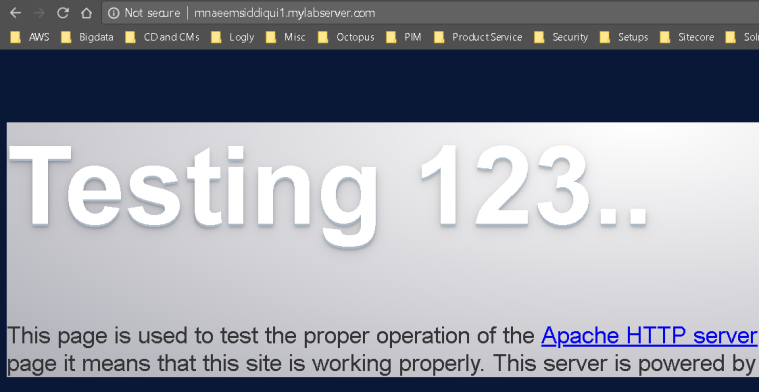
- Test if the Apache is working or not
- To check the host name – hostname or ip addr
- Now in browser type : http://thevalue_ugot_from_hostname_command or http://ip_addr or http://localhost
- If you are getting the below screen then
- Now that Apache is working and also that we have already installed MariaDB, we need to configure and run it
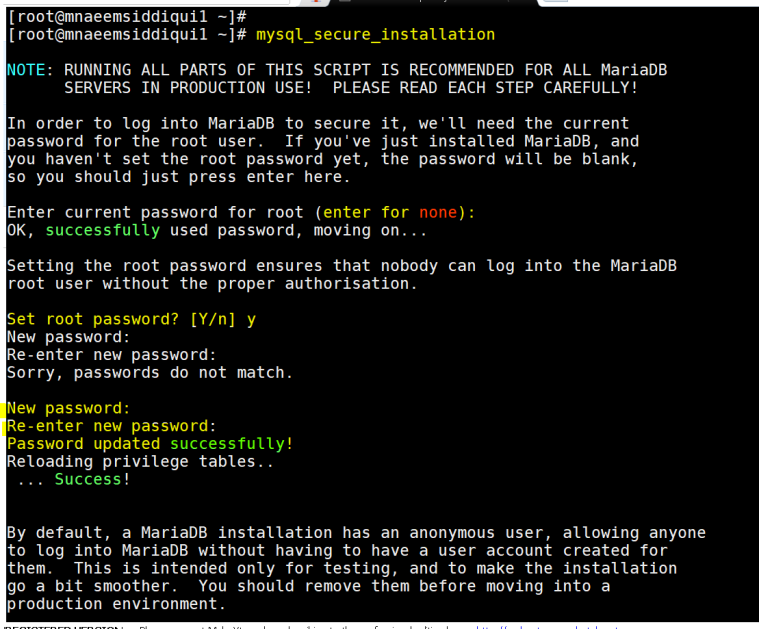
- To configure MySQL or MariaDB run – mysql_secure_installation
- It will start a wizard and will prompt you for password, simply press “Enter” because you have not setup the password as yet
- Then it will ask – Set root password? , Type ‘Y’ and then provide password you want to set.
- After that it will prompt you with 4 more questions – Just type ‘Y’ for all, till you get a success message
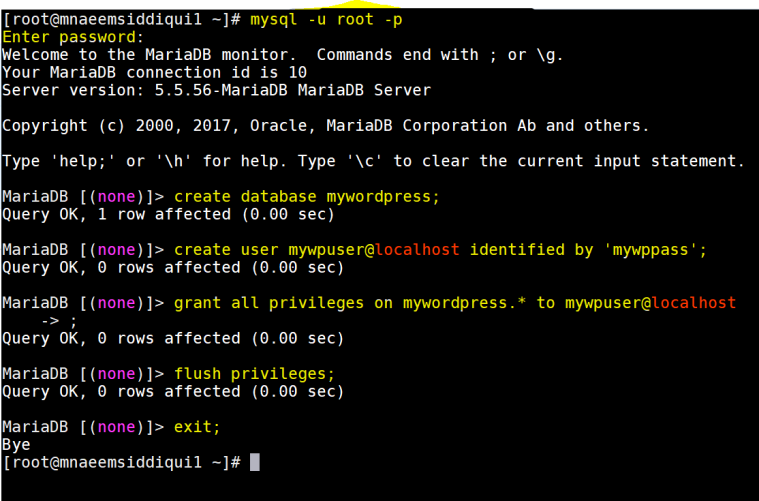
- Now login to MySQL – mysql -u root -p
- Use the above password and login to get the MariaDB prompt.
- Now we have to create the following :
- a database for WordPress – create database mywordpress;
- a user for WordPress – create user mywpuser@localhost identified by ‘mywppass’;
- grant all privileges to this user – grant all privileges on mywordpress.* to mywpuser@localhost;
- flush the privileges so that they get applied – flush privileges;
- then exit MySQL – exit;
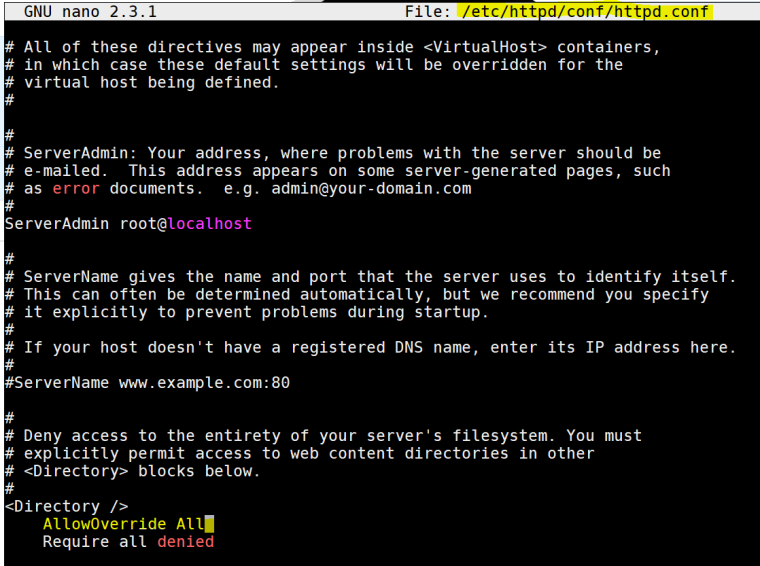
- Set ReWriteRule to :
- edit /etc/httpd/conf/httpd.conf
- and update AllowOverride All
- If you have Ubuntu or an Debian Linux based distro, then use apt-get instead of yum and also some of the names will change e.g. httpd will be replaced by apache2
- Setting Up WordPress:
- Download latest WordPress package – wget https://wordpress.org/latest.zip
- Unzip the zip file – unzip latest.zip
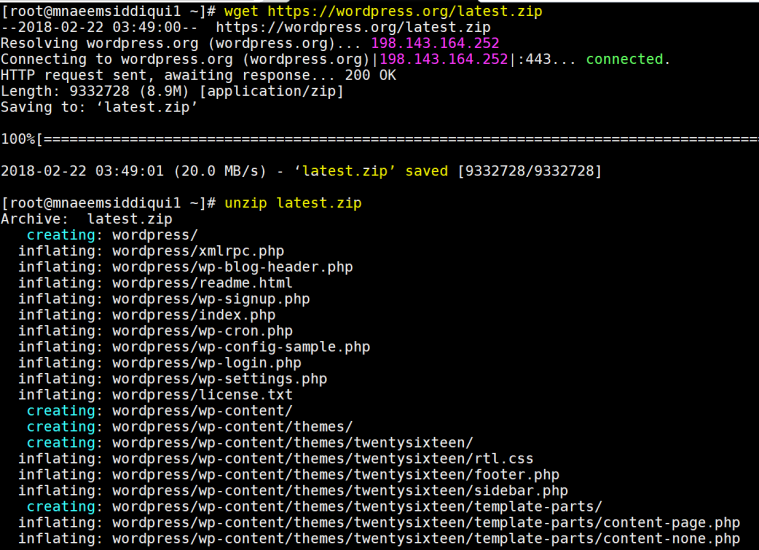
- View the wordpress folder created by the above action – ls -ltr wordpress
- Now copy the wordpress folder to /var/www/html – cp -avr wordpress /var/www/html
- Grant permissions on wordpress folder –
- chmod -R 755 /var/www/html/
- Change the owner pf wordpress folder to Apache –
- chown -R apache:apache /var/www/html/
- Rename file ‘wp-config-sample.php’ to ‘wp-config.php’- mv wp-config-sample.php wp-config.php
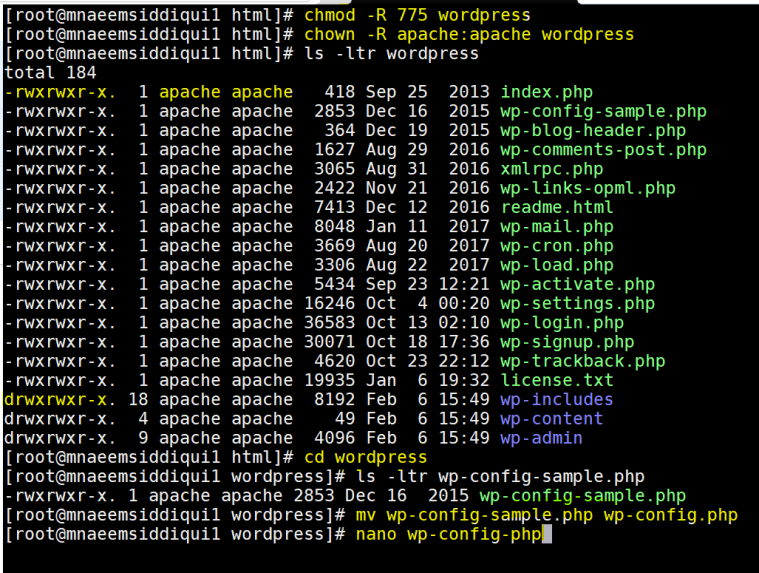
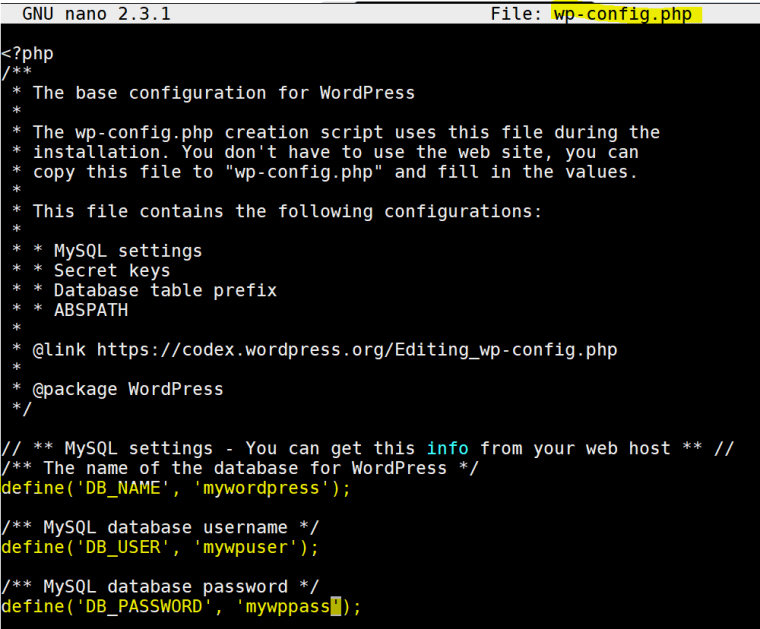
- Edit file wp-config.php – nano wp-config.php with follwing details:
- define(‘DB_NAME’, ‘mywordpress’);
define(‘DB_USER’, ‘mywpuser’);
define(‘DB_PASSWORD’, ‘mywppass’);
- define(‘DB_NAME’, ‘mywordpress’);
- We are done with installation, lets try connecting to WordPress
- Type –
- http://localhost/wordpress if your host is local
- http://ip_addr/wordpress(get IP Address by executing ip addr command)
- http://hostname/wordpress (get Host name by executing hostname command)
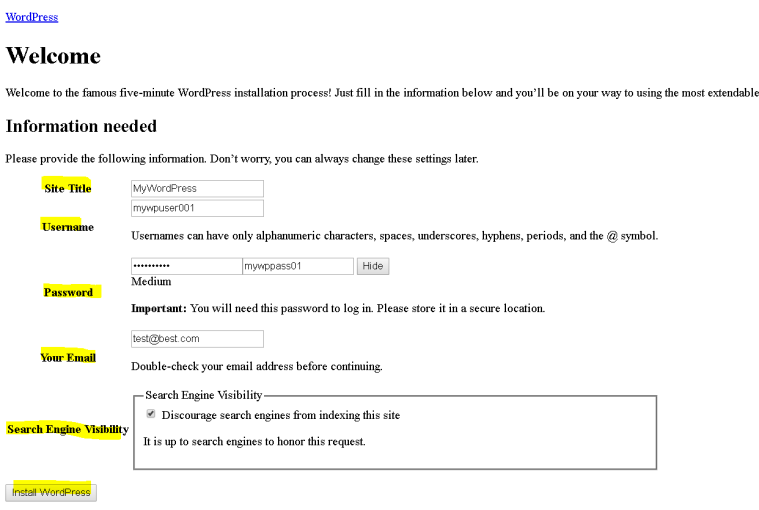
- You will get a setup page to enter site name, create a user and then you can click ‘Install WordPress’.
- You will get a success screen and a link to login – use the above user and password to login
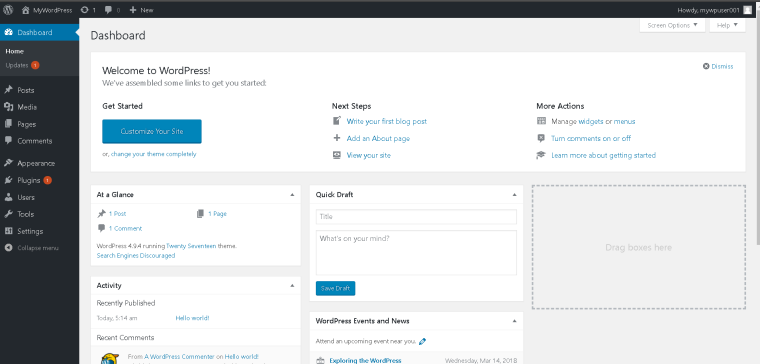
- yay!!!, you have successfully installed WordPress on a LAMP stack.
- Type –

Happy holidays to all, At this year, it seems to be which include WordPress is the most well-liked running a blog system accessible directly at this time. (versus what I’ve browse) Is that what you’re getting upon your blog site? Excellent article, nevertheless, I was pondering if your self may well create a small a lot more upon this make a difference?
Thanks a lot