The original post is on GitHub at location – https://github.com/naeemmohd/serverless/blob/master/serverless002-paymentserviceplusalerts-using-s3lambdadynamodbstopfunctions/README.md
This article shows how to use these AWS services – S3, Lambda Functions, Step Functions, API Gateway and DynamaDB to process a payment.
Objective:
- For the Billling and Payment process, a file is placed/updated in S3 everyday for customers whose Bill is due/pending and
- Next, this Bills Due file is processed by a Lambda Function to update the information in a DynamoDB table and
- Next, on the Billings Website, a customer retrives his bill by entering his Invoice ID and makes a payment and
- Next, the payment is processed and Balance is updated to zero and
- Finally, a text or email alert is sent to customer confirming his payment
Lets tabulate the steps as below:
| Steps | Actions |
|---|---|
| Prerequisite | Generate the ‘Bills Due’ file for specific day |
| S3 | Create a S3 bucket and upload the ‘Bills Due’ file |
| DynamoDB | Create a table to store ‘Bills Due’ |
| Lambda Functions | Create functions to update DynamoDB database with ‘Bills Due’ info, email and text alert, process payment etc |
| Step Function | Create a Step function to create a work flow which will process the payment and send email/text alert |
| API Gateway | create a managed API Gateway service to expose endpoints to getBalance and processPaymentFlow Lambda functions |
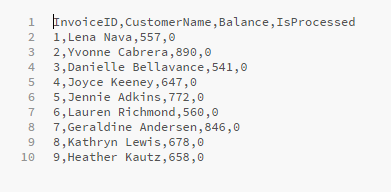
Prerequisite – Generate the ‘Bills Due’ file for specific day
- I am using an arbitrary logic to generate the file.
- Once generated, the file will look like below
- Here is the code for the file(PaymentBalanceGenerator.py):
  # Prerequisites: Please install the following before genarating the file.
  # install pip and dependencies
  # sudo apt-get install python-pip python-dev build-essential
  # install names
  # pip install names
  import names
  import random
  import os

  dirName = 'logs';
  if not os.path.exists(dirName):
      os.mkdir(dirName)

  filePath = dirName + '/paymentbalance.csv';
  with open(filePath, 'w+') as outfile:
      numRows = range(1,1001)
      outfile.write('InvoiceID,CustomerName,Balance,IsProcessed\n')
      strRow = ''
      for numRow in numRows:
          strRow = str(numRow) + ',' + names.get_full_name(gender='female') + ',' + str(random.randint(500, 900)) + ',0'
          outfile.write(strRow + '\n')
      outfile.close()

  print('Please check the file at path:' + os.path.abspath(filePath));
- Now save and execute the above python file(PaymentBalanceGenerator.py will generate a csv file ‘paymentbalance.csv’ in logs folder):
python PaymentBalanceGenerator.py
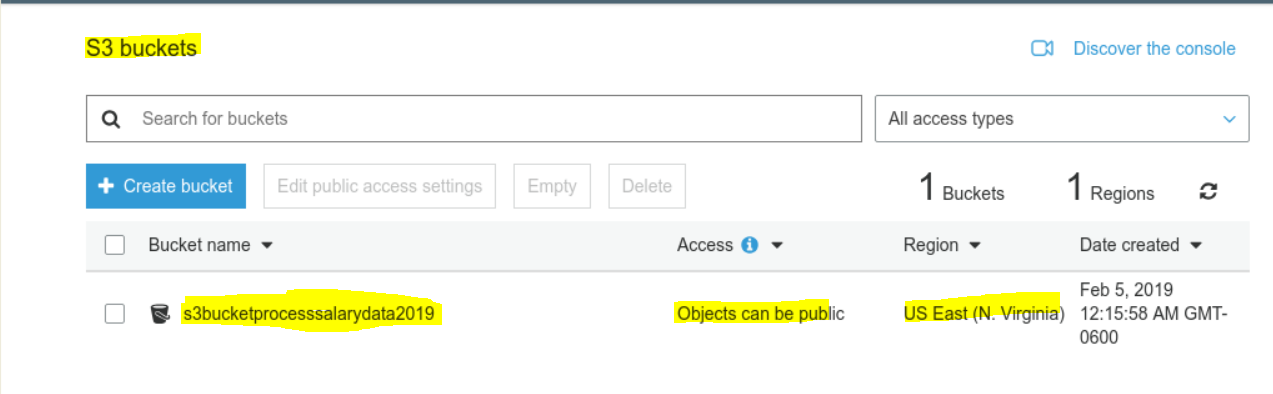
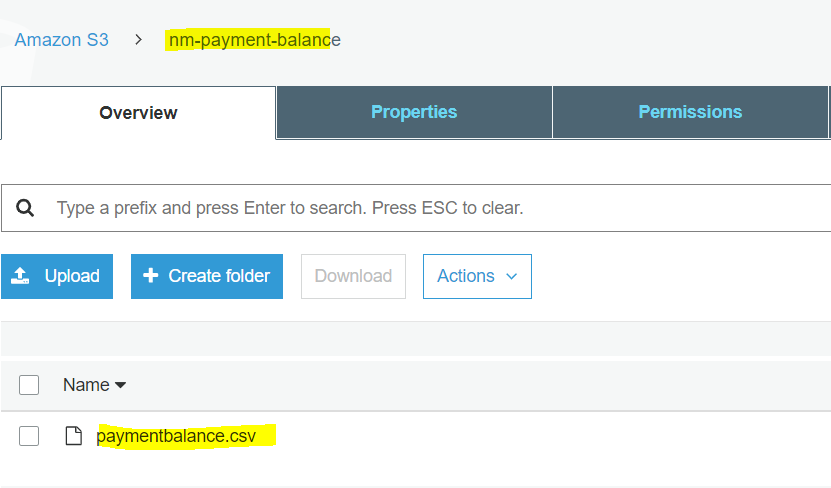
S3 – Create a S3 bucket and upload the ‘Bills Due’ file
- Create a bucket name – any universally unique name is okay.
- Lets create a bucket named – nm-payment-balance**
- Please see the snapshot below
Lambda | Create a Lambda function with a trigger which gets invokes as a file is uplaoded to S3
-
Create the follwing Lambda Functions – .
-
- PaymentBalanceRetriever.py –
- This lambda function will have a trigger associated on bucket nm-payment-balance
- Once the file ‘paymentbalance.csv’ is uploaded to the vucket, this lambda function will read the file and update the info in a DunamoDB table ‘PaymentBalance’
- PaymentBalanceRetriever.py –
-
Here is the code as below:
import boto3 import csv import json s3 = boto3.client('s3') dynamodb = boto3.client('dynamodb') def handler(event, context): # Get the object from the event then download it to Lambda tmp space bucket = event['Records'][0]['s3']['bucket']['name'] key = event['Records'][0]['s3']['object']['key'] if '.csv' not in key: return 'Not a csv that needs processing' s3.download_file(bucket, key, '/tmp/' + key) # Use DynamoDB atomic counters to tally visits in csv with open('/tmp/' + key, 'r') as infile: first_line = infile.readline() for row in infile: ddb_InvoiceId = row.strip().split(',')[0] ddb_CustomerName = row.strip().split(',')[1] ddb_Balance = row.strip().split(',')[2] ddb_Processed = row.strip().split(',')[3] response = dynamodb.update_item( TableName='PaymentBalance', Key={ 'InvoiceID': {'N': ddb_InvoiceId} }, UpdateExpression='set Balance=:balance, IsProcessed=:processed, CustomerName=:customerName', ExpressionAttributeValues={ ':balance': {'N': ddb_Balance}, ':processed': {'N': ddb_Processed}, ':customerName': {'S': str(ddb_CustomerName)} }, ReturnValues="UPDATED_NEW" ) print(response) -
- getBalance.js –
- This lambda function reads a record from DynamoDB table ‘PaymentBalance’ and returns the document/row.
- This function is called from the web form to return the bill due details based on a specific Invoice Id entered by user on the form
- Here is the code as below:
'use strict';

var AWS = require("aws-sdk");
AWS.config.update({region: "us-east-1"});
var db = new AWS.DynamoDB.DocumentClient();

module.exports.get = (event, context, callback) => {

    const data = event.queryStringParameters;
    const params = {
        TableName: "PaymentBalance",
        Key: {
          InvoiceID: parseInt(data.InvoiceID)
        }
    };

    db.get(params, (err, result) => {
        if (err) {
            console.error(err);
            const errorResponse = {
                statusCode: err.statusCode || 501,
                headers: { 'Content-Type': 'text/plain'},
                body: JSON.stringify('Sorry, Cound not get the item for:' + data.InvoiceID),
            };
            callback(null, errorResponse);
            return;
        };

        const successResponse = {
            statusCode: 200,
            body: "Retrieved Item successfully. " + JSON.stringify(result),
        };
        callback(null, successResponse);
    });
};
- getBalance.js –
-
-
- postPayment.py –
- This lambda function takes the inputs from the user and posts the payment and updates the ‘PaymentBalance’ table.
- Although in a real environment a third party payment service will be called and based on the results from that service the ‘PaymentBalance’ table will be updated
- Here we are assuming the payment is processed by third party and we have to only uodated the table by setting = balance = 0 and isprocessed = 1
- Here is the code as below:
import boto3
import csv
import json

s3 = boto3.client('s3')
dynamodb = boto3.client('dynamodb')

def lambda_handler(event, context):
    # assuming the payment was process by a third party after passing payment info securily and encrypted.
    # another lambda function can handle the real payment processing via a third party
    invoiceId = event['InvoiceID']
    billerName = event['BillersName']
    # manually seeting balance as 0 and isprocessed as 1 simulate as if a payment was done.
    balance = 0
    isprocessed = 1
    response = dynamodb.update_item(
        TableName='PaymentBalance',
        Key={
            'InvoiceID': {'N': invoiceId}
        },
        UpdateExpression='set Balance=:balance, IsProcessed=:processed, CustomerName=:customerName',
        ExpressionAttributeValues={
            ':balance': {'N': str(balance)},
            ':processed': {'N': str(isprocessed)},
            ':customerName': {'S': str(billerName)}
        },
        ReturnValues="UPDATED_NEW"
    )
    print(response)
    return event;
- postPayment.py –
-
- processEmails.py –
-
This lambda function will be used to send to process emails after the payment is posted.
-
‘event’ object returns the BilliAmount, BillerName, InvoiceID etc
-
The function used SES function ‘send_email’ to send emails
-
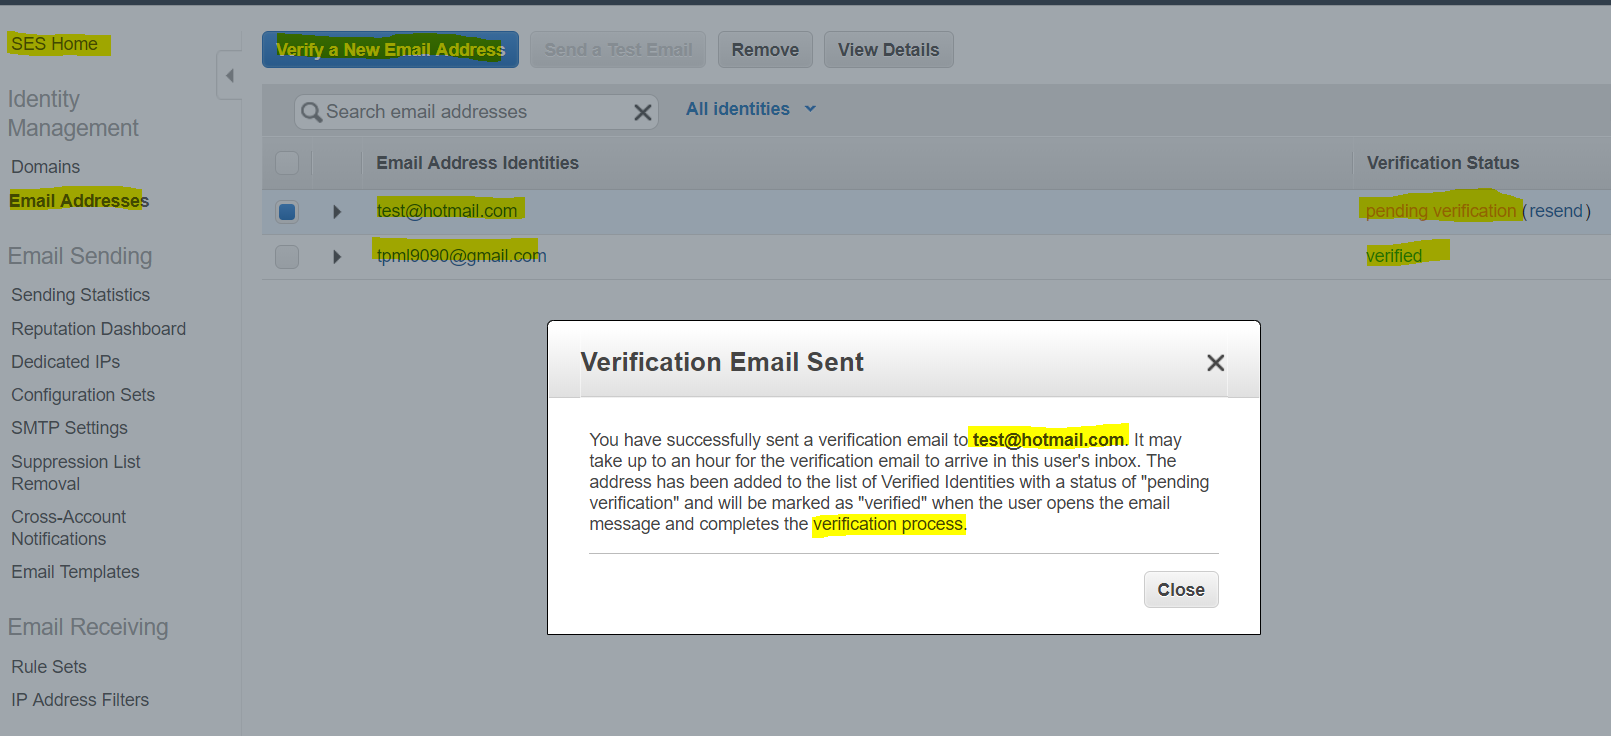
IMPORTANT
- Since the Non Prod SES is a Sanbox environment, onlt a verified email id can be used for source and destination for the emails
- But on Prod environments no such email verification is needed
- To verify an email go the the SES Dashboard and verify an email, a verification email will be sent and once you click on the verification link then the email gets verified.
- See snapshot below.
-
Here is the code as below:
import boto3

VERIFIED_EMAIL = 'tpml9090@gmail.com'

ses = boto3.client('ses')

def lambda_handler(event, context):

    email_subject = 'A payment of amount:' + event['BillingAmount'] + ' has been processed for Invoice Id:' + event['InvoiceID'] + '.'
    email_body = ' Mr./Ms. ' + event['BillersName'] + '\n Thank you, \n A payment of amount:' + event['BillingAmount'] + ' has been processed for Invoice Id:' + event['InvoiceID'] + '.'

    ses.send_email(
        Source=VERIFIED_EMAIL,
        Destination={
            'ToAddresses': [event['EmailId']]
        },
        Message={
            'Subject': {'Data': email_subject},
            'Body': {'Text' : {'Data': email_body }}
        }
    )
    return 'Success!'
-
- processEmails.py –
-
- processTexts.py –
- This lambda function will be used to send to process texts after the payment is posted.
- ‘event’ object returns the BilliAmount, BillerName, InvoiceID etc
- The function uses SNS function ‘publish’ to send emails
- Here is the code as below:
import boto3

sns = boto3.client('sns')

def lambda_handler(event, context):
    sns_msg = 'A payment of amount:' + event['BillingAmount'] + ' has been processed for Invoice Id:' + event['InvoiceID'] + '.'
    sns.publish(PhoneNumber=event['PhnNumber'], Message=sns_msg)
    return 'Success!'
- processTexts.py –
-
- processPaymentMachine.py –
- This lambda function will used to validate the input from the web form.
- If the data posted is invalid then this function returns an error back to the form as response
- If thee data is valid then it calles the STATE Machine/Step function
- You must enter a valid Step Function ARN for this Lambda function to work
- The function uses actually calls the Step function to call a series of other functions as workflow
- The ‘start_execution’ function posts the input data to the function to process it.
- Here is the code as below:
import boto3
import os
import json
import decimal

# PLease replace with an actual Step function ARN as this ARN is a test URL
ARN_OF_STATEMACHINE = 'arn:aws:states:us-east-1:1234567890:stateMachine:processPaymentMachine'

sfn = boto3.client('stepfunctions')

def lambda_handler(event, context):
    print('Processing the event:')
    print(event)
    data = json.loads(event['body'])
    data['WaitSeconds'] = int(data['WaitSeconds'])

    # Validation Check
    validationCheck = []
    validationCheck.append('WaitSeconds' in data)
    validationCheck.append(type(data['WaitSeconds']) == int)
    validationCheck.append('InvoiceID' in data)
    validationCheck.append('BillersName' in data)
    validationCheck.append('BillingAmount' in data)
    validationCheck.append('CardNumber' in data)
    validationCheck.append('ExpiryDate' in data)

    if data.get('Choices') == "both":
        validationCheck.append('EmailId' in data)
        validationCheck.append('PhnNumber' in data)
    elif data.get('Choices') == "email":
        validationCheck.append('EmailId' in data)
    elif data.get('Choices') == "text":
        validationCheck.append('PhnNumber' in data)

    # Check for any errors in validation validationCheck
    if False in validationCheck:
        response = {
            "statusCode": 400,
            "headers": {"Access-Control-Allow-Origin":"*"},
            "body": json.dumps(
                {
                    "Status": "Success",
                    "Reason": "Sorry, please verify the data you posted and try again!!!"
                },
                cls=DecimalEncoder
            )
        }
    else:
        sfn.start_execution(
            stateMachineArn=ARN_OF_STATEMACHINE,
            input=json.dumps(data, cls=DecimalEncoder)
        )
        response = {
            "statusCode": 200,
            "headers": {"Access-Control-Allow-Origin":"*"},
            "body": json.dumps(
                {"Status": "Success"},
                cls=DecimalEncoder
            )
        }
    return response

# This is a workaround for: http://bugs.python.org/issue16535
class DecimalEncoder(json.JSONEncoder):
    def default(self, obj):
        if isinstance(obj, decimal.Decimal):
            return int(obj)
        return super(DecimalEncoder, self).default(obj)
- This lambda function will used to validate the input from the web form.
- processPaymentMachine.py –
Step Function | Create a Step function to create a work flow which will process the payment and send email/text alert
- This step is the most important step in the this project
- We will create a workflow using the workflow json which will govern how this steps fucntion/state engoine will move from one state to the to process and call other lambda functions.
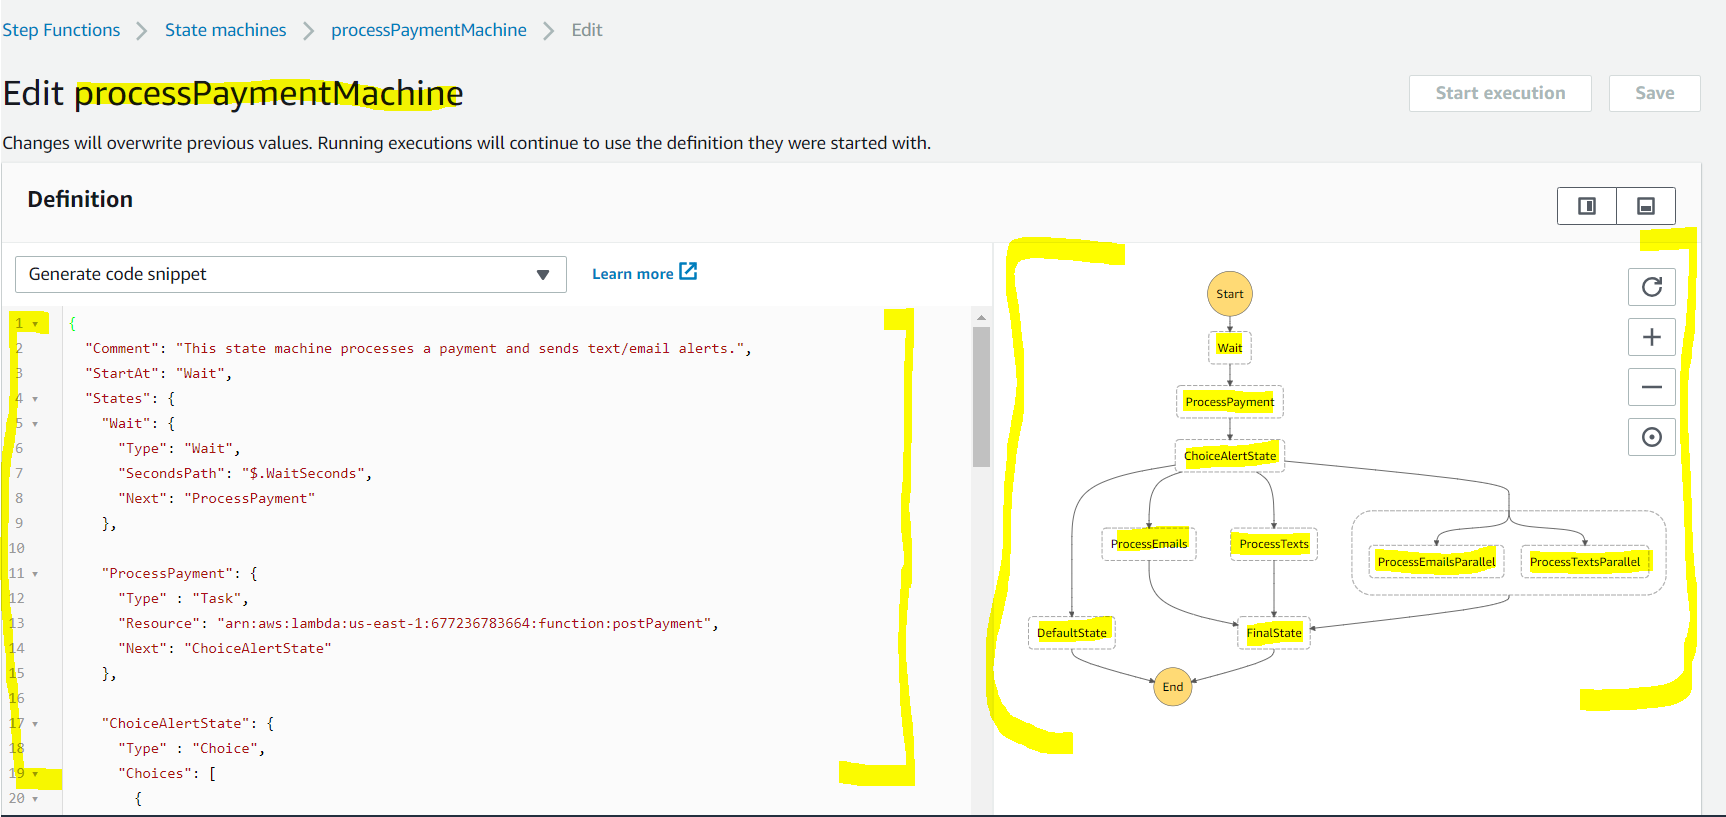
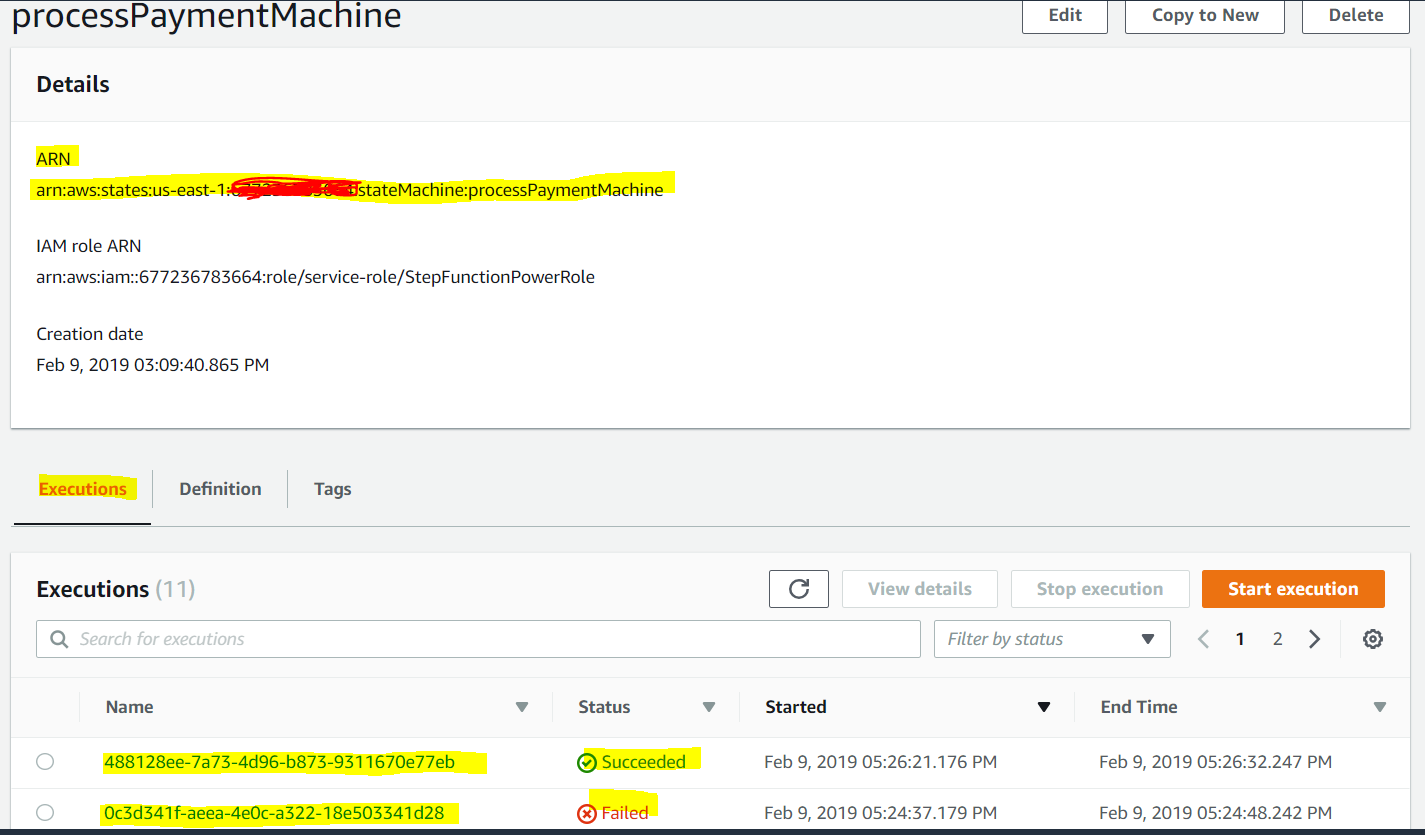
- You can visually see how the state flow looks like and if it succed it shows you the passed workflow else the fialed workflow.
- The work flow starts with
- ‘Wait’ state for 1 sec
- Then it moves to ‘ProcessPayment’ state to process the payment
- Then it moves to ‘ChoiceAlertState’ task to choice if we the user only wants email or text or both kind of alerts
- In case of both email and text it enters in a ‘Parallel’ type state
- Then it moves to ‘Finalstate’ state to process the payment and reach the end of the work flow
- In case of any error it moves to state ‘DefaultState’ which is basically error state
- Here is the workflow code for the step function:
{ "Comment": "This state machine processes a payment and sends text/email alerts.", "StartAt": "Wait", "States": { "Wait": { "Type": "Wait", "SecondsPath": "$.WaitSeconds", "Next": "ProcessPayment" }, "ProcessPayment": { "Type" : "Task", "Resource": "ARN_OF_POSTPAYMENTS", "Next": "ChoiceAlertState" }, "ChoiceAlertState": { "Type" : "Choice", "Choices": [ { "Variable": "$.Choices", "StringEquals": "email", "Next": "ProcessEmails" }, { "Variable": "$.Choices", "StringEquals": "text", "Next": "ProcessTexts" }, { "Variable": "$.Choices", "StringEquals": "both", "Next": "ProcessEmailsandTextsBoth" } ], "Default": "DefaultState" }, "ProcessEmails": { "Type" : "Task", "Resource": "ARN_OF_PROCESSEMAILS_FUNCTION", "Next": "FinalState" }, "ProcessTexts": { "Type" : "Task", "Resource": "ARN_OF_PROCESSTEXTS_FUNCTION", "Next": "FinalState" }, "ProcessEmailsandTextsBoth": { "Type": "Parallel", "Branches": [ { "StartAt": "ProcessEmailsParallel", "States": { "ProcessEmailsParallel": { "Type" : "Task", "Resource": "ARN_OF_PROCESSEMAILS_FUNCTION", "End": true } } }, { "StartAt": "ProcessTextsParallel", "States": { "ProcessTextsParallel": { "Type" : "Task", "Resource": "ARN_OF_PROCESSTEXTS_FUNCTION", "End": true } } } ], "Next": "FinalState" }, "DefaultState": { "Type": "Fail", "Error": "DefaultStateError", "Cause": "Error!" }, "FinalState": { "Type": "Pass", "End": true } } } - Please see the snalshot of the State engione work flow.

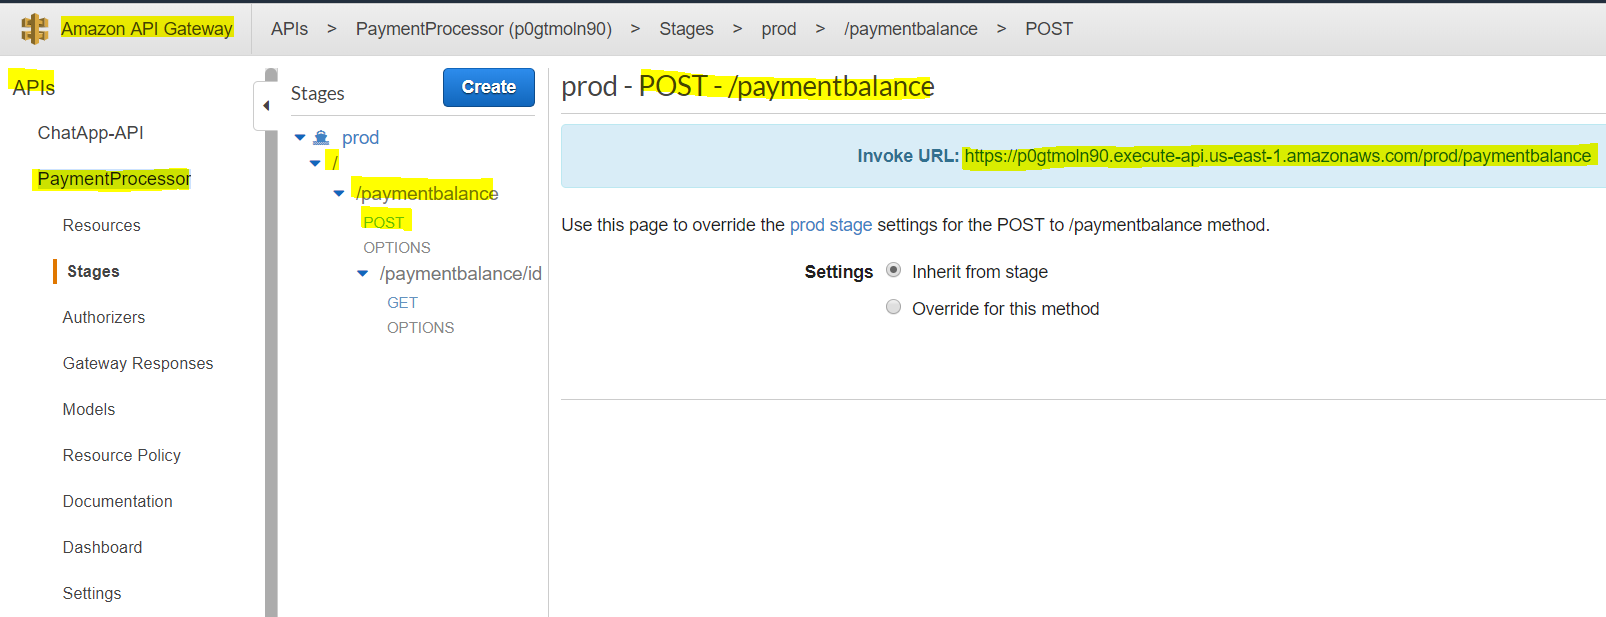
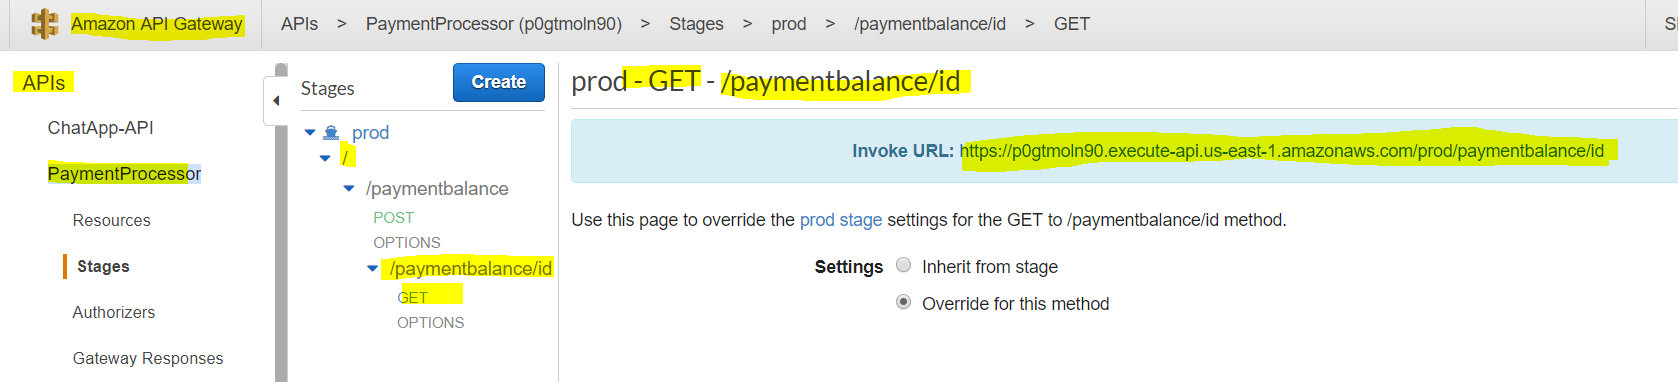
API Gateway | create a managed API Gateway service to expose endpoints to getBalance and processPaymentFlow Lambda functions
- The will have a child resource ID which will execute the ‘getBalance’ Lambda functions and takes INvoiceID as queryString.
- Steps to create a API Gateway
- Create a API name – PaymentProcessor
- Create a Resource – paymentbalance
- Create a method – POST – this method will call the postPayment Lambda Function
- Create a child resource ID and then a GET method – this method will call the getBalance Lambda Function
- Enable CORS for cross origin resource sharing
- Deploy the API to a stage – e.g Prod
- Please see the snapshot below.
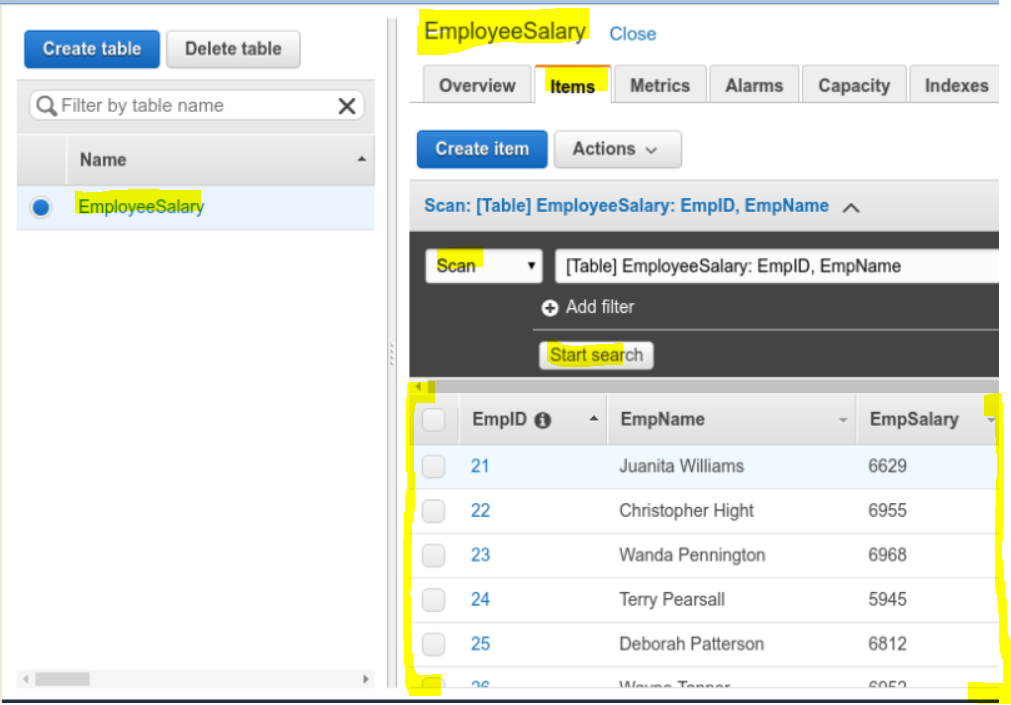
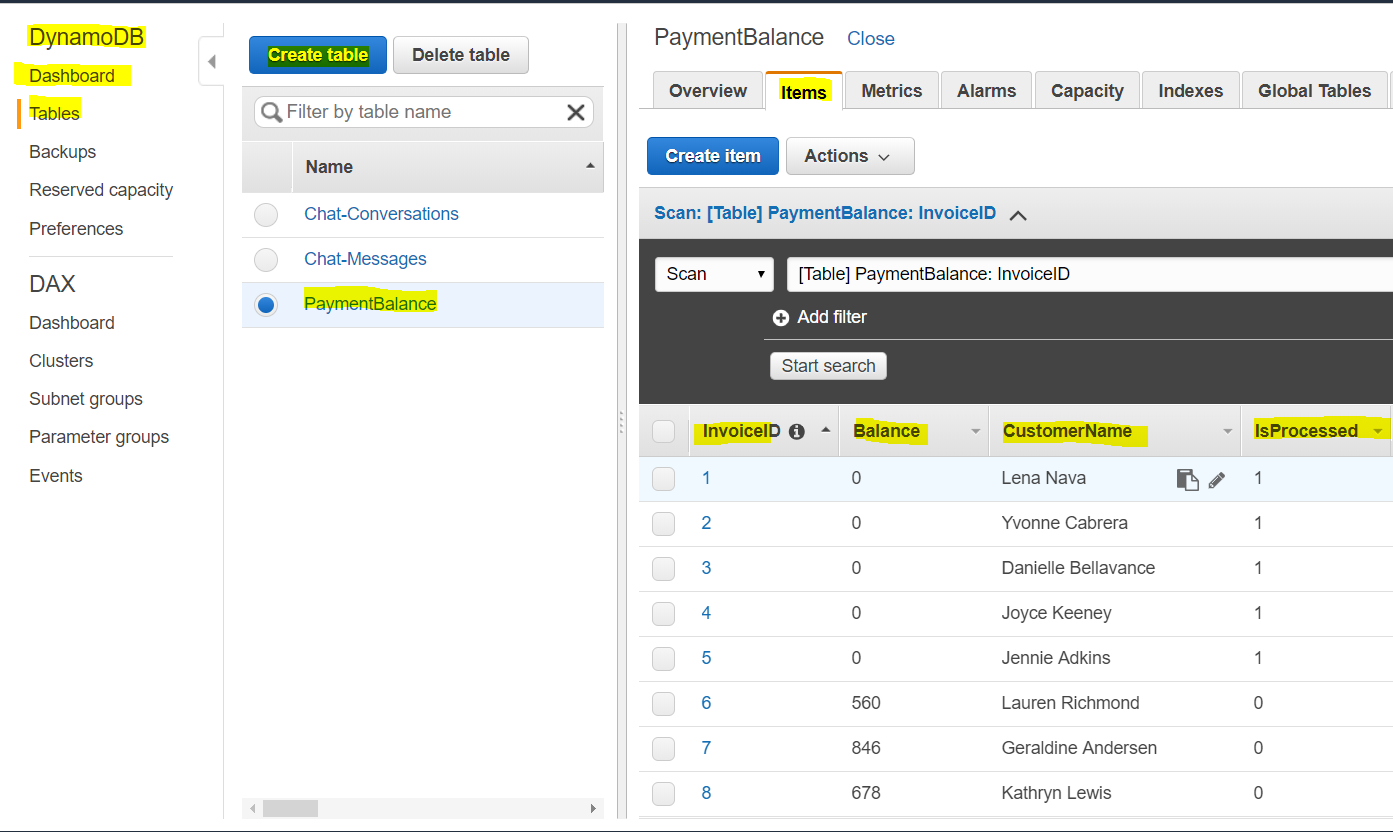
DynamoDB | Once the file is getting processed keep writing and updating the data in a table
- Create a DynamoDB table ‘PaymentBalance’ with Primary Key as ‘InvoiceID’ .
- Please see the snapshot below.
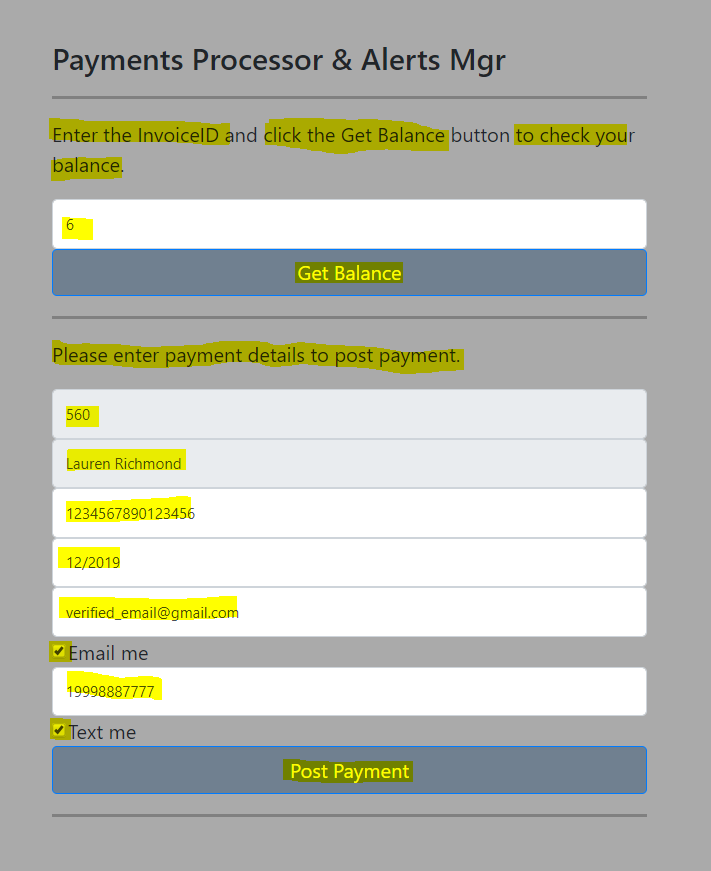
the S3 website and how the customer submits a payment
- Please upload the contents of the website folder to a S# bucket and configure it as a website.
- The user first enters the ‘InvoiceID’ to retrive the bill details
- Once the bill details( InvoiceID, BillersName, Amount Due) are retrived the user eneters the ceredit card into ans submits the data
- A form with valid Bill due amount
- A form with 0 Bill due amount

- Code snippet for the HTML page
<!DOCTYPE html> <html lang="en"> <head> <meta charset="utf-8"> <meta name="viewport" content="width=device-width, initial-scale=1, shrink-to-fit=no"> <title>Payments Processor & Alerts Mgr</title> <!-- CSS Files References --> <link rel="stylesheet" href="https://cdnjs.cloudflare.com/ajax/libs/twitter-bootstrap/4.2.1/css/bootstrap.min.css"> <link href="main.css" rel="stylesheet"> </head> <body>Payments Processor & Alerts Mgr
Enter the InvoiceID and click the Get Balance button to check your balance.
InvoiceID Get Balance
Please enter payment details to post payment.
Billing Amount Billers Name Card Number Expiry Date Email Id Email me
Phone Number Text me
Post Payment
</form> </div> <!-- JS Files References --> http://main.js https://code.jquery.com/jquery-3.1.1.slim.min.js https://cdnjs.cloudflare.com/ajax/libs/tether/1.4.0/js/tether.min.js https://cdnjs.cloudflare.com/ajax/libs/twitter-bootstrap/4.2.1/js/bootstrap.min.js https://cdnjs.cloudflare.com/ajax/libs/jquery/3.3.1/jquery.min.js https://cdnjs.cloudflare.com/ajax/libs/fetch/2.0.1/fetch.js </body> </html> - Code snippet for the JS file
// Please enter the actual APIGATEWAYURL from the API Gateway Screen var APIGATEWAYURL = 'https://p0gtmoln90.execute-api.us-east-1.amazonaws.com/prod'; // setup divs for error, success and results var divError = document.getElementById('error-msg') var successDiv = document.getElementById('success-msg') var resultsDiv = document.getElementById('results-msg') var invoiceID = document.getElementById('InvoiceID') var billingAmount = document.getElementById('BillingAmount') var billersName = document.getElementById('BillersName') var cardNumber = document.getElementById('CardNumber') var expiryDate = document.getElementById('ExpiryDate') var emailId = document.getElementById('EmailId') var phnNumber = document.getElementById('PhnNumber') var emailChoice = document.getElementById('EmailChoice') var textChoice = document.getElementById('TextChoice') var postPaymentButton = document.getElementById('postPaymentButton') // setup functions to get the field data function getInvoiceID() { return invoiceID.value } function getBillingAmount() { return billingAmount.value } function getBillersName() { return billersName.value } function getCardNumber() { return cardNumber.value } function getExpiryDate() { return expiryDate.value } function getEmailId() { return emailId.value } function getPhnNumber() { return phnNumber.value } function getEmailChoice() { return emailChoice.value } function getTextChoice() { return textChoice.value } function clearMessageDivs(state) { // clear the error, sucess and results div to refresh the content divError.textContent = ''; resultsDiv.textContent = ''; successDiv.textContent = ''; invoiceID.disabled = false; billersName.disabled = true; billingAmount.disabled = true; if(state == 'get'){ cardNumber.disabled = false; expiryDate.disabled = false; emailId.disabled = false; phnNumber.disabled = false; emailChoice.disabled = false; textChoice.disabled = false; postPaymentButton.disabled = false; } else{ cardNumber.disabled = true; expiryDate.disabled = true; emailId.disabled = true; phnNumber.disabled = true; emailChoice.disabled = true;; textChoice.disabled = true;; postPaymentButton.disabled = true; } } clearMessageDivs('load'); // Add the click listeners for both buttons button that make the API request document.getElementById('getBalanceButton').addEventListener('click', function (event) { // prevent page reloading by clear message Divs event.preventDefault() clearMessageDivs('get') // Call the GET API service by Passing the InvoiceID fetch(APIGATEWAYURL+ '/paymentbalance/id?InvoiceID='+getInvoiceID(), { headers:{ "Content-type": "application/json" }, method: 'GET', mode: 'cors' }) .then((resp) => resp.json()) .then(function(data) { console.log(data) if(data.Item.Balance<=0){ clearMessageDivs('postnobalancedue') } successDiv.textContent = 'Please check your balance and make proper payment.'; resultsDiv.textContent = JSON.stringify(data); invoiceID.value = data.Item.InvoiceID; billersName.value = data.Item.CustomerName; billingAmount.value = data.Item.Balance; }) .catch(function(err) { divError.textContent = 'Sorry, We could not pull your bill details:\n' + err.toString(); console.log(err) }); }); document.getElementById('postPaymentButton').addEventListener('click', function (event) { // prevent page reloading by clear message Divs event.preventDefault() clearMessageDivs('post') var choices = "both" if (getEmailChoice() == '1' && getTextChoice() == '1') choices = "both" else if(getEmailChoice() == '1') choices = "email" else if(getEmailChoice() == '1') choices = "text" // Prepare the appropriate HTTP request to the API with fetch // update uses the /prometheon/id endpoint and requires a JSON payload fetch(APIGATEWAYURL+ '/paymentbalance', { headers:{ "Content-type": "application/json" }, method: 'POST', body: JSON.stringify({ 'InvoiceID': getInvoiceID(), 'BillersName': getBillersName(), 'BillingAmount': getBillingAmount(), 'CardNumber': getCardNumber(), 'ExpiryDate': getExpiryDate(), 'EmailId': getEmailId(), 'PhnNumber': getPhnNumber(), 'Choices': choices, 'WaitSeconds': 10 }), mode: 'cors' }) .then((resp) => resp.json()) .then(function(data) { console.log(data) successDiv.textContent = 'Congratulations, Your payment has been posted and an email/SMS as chosen by you has been sent.'; resultsDiv.textContent = JSON.stringify(data); }) .catch(function(err) { divError.textContent = 'Sorry, we could not process your payment request:\n' + err.toString(); console.log(err) }); }); - For rest of the file details please see the website folder
- A form with valid Bill due amount