A Job to check if Solr slaves are in sync with master

Scenario:

  • We use Solr for our searches and showing product pages in our Sitecore website.
  • We have multiple Solr slaves behind the load balancer which are replicated from master.
  • These Solr slaves fetch the product data for our searches
  • The issue was that out of our 20 odd CD servers some products were showing latest products but others not.
  • On careful observation we found that one of the multiple SOLR slaves was out of sync and from behind the load balancer when this SOLR server returned results to the CD servers, it was not showing latest products.
  • We decided to create a scheduled job alert which would show an alert message if the document count from slave SOLR server does not match with the master SOLR server.

Solution:

  • Here is the alert script written in PowerShell
  • The script holds master Solr servernames, the list of slaves Solr server names, the list of all the indexes to compare into variables.
  • A Solr query is used to return the number of documents for a particular  index – $docCountFilter = “select?q=*%3A*&rows=1&fl=numfound&wt=json&indent=true”.
  • It loops through the list of indexes and server names to retrieve the number of documents from master and slaves and then compares them.
  • If there is any mismatch or servers are out of sync then we add that server name to the variable $outofsynchServers
  • Finally we return the array of those servers.
  • While you create the alert you can make it run periodically( say every 5-10 mts) the alert will get fired if the return value is not a blank.
  • This exercise helped us to monitor our Solr instances and before business or user can know about any server who are displaying latest products, we come to know and reset the faulty Solr to sync it by taking it out of the mix behind the load balancer. Once fixed we add the that Solr slave back to the mix.
  • $masterServerNames = “mastersolrIP”

    $slaveServerNames = @(“slavesolr1IP”,”slavesolr2IP”,”slavesolr3IP”)

    $solrIndexNames = @(“catalog_index_web”,”sitecore_index_web”)

    $outofsynchServers = [System.Collections.ArrayList]@()

    $docCountFilter = “select?q=*%3A*&rows=1&fl=numfound&wt=json&indent=true”

    foreach($solrIndex in $solrIndexNames){

    $solrMasterNameWithPort = “http://$($masterServerNames)/solr”

    $solrMasterDocCount = Invoke-WebRequest “$($solrMasterNameWithPort)/$solrIndex/$($docCountFilter)” | ConvertFrom-Json

    #write-host “$($solrMasterNameWithPort)/$solrIndex/$($docCountFilter)”

    #write-host “Solr Master $($($masterServerNames)) Catalog Web Doc Count: ” $solrMasterDocCount.response.numfound

    foreach($slave in $slaveServerNames){

    $solrSlaveNameWithPort = “http://$($slave)/solr”

    $solrSlaveDocCount = Invoke-WebRequest “$($solrSlaveNameWithPort)/$solrIndex/$($docCountFilter)” | ConvertFrom-Json

    #write-host “$($solrSlaveNameWithPort)/$solrIndex/$($docCountFilter)”

    #write-host “Solr Slave $($slave) Catalog Web Doc Count: ” $solrSlaveDocCount.response.numfound

    If ($solrMasterDocCount.response.numfound -ne $solrSlaveDocCount.response.numfound)

    {

    $outofsynchServers+=($slave);

    }

    }

    }

    $outofsynchServers | select -uniq

A New Cache Diagnostics Page

  • The Problem:
    • We have more than 50 odd servers in production behind the F5 loadbalancer
    • In a normal scenario any website uses different data retrieval techniques using different caching techniques.
    • A week back we faced a production issue where the cached data was not getting cleared properly on one or two specific servers only.
    • Sitecore has an out of the box “No Login Cache Page”(/Diag/NoLoginCache.aspx) to view and manage cache data
    • The problem was that you will have to access each of these 50 CD( Contect Delivery) servers and check if cache was cleared properly or not.
  • The Challenge:
    • We wanted to develop a ‘Cache Diagnostics’ page which will be deployed on the CM(Content Management/Authoring server) which will connect to all these 50 odd CD servers to retrieve the cache information from all these servers and show that data in a tabulated matrix data.
  • The Design:
    • A achieve the above result, this is what we wanted to design
      • expose a service end point on each of these CD servers to retentive cache information from each server
      • expose a proxy service endpoint on the CM sites  to communicate with these CD servers to retrieve the data data from CD servers
      • develop a simple single page( using AngularJS/Ajax) which consumes the service data and shows the information from all these 50 odd servers
  • The Solution:
    • Exposing a service end point on CD servers:
      • The code is easy and self explanatory.
      • Suppose you have multi language multi site Sitecore instance. E.g. You have 2 websites as website 1 and website 2 and both in 2 languages MX and CA.
      • [EnableCors(origins: “*”, headers: “*”, methods: “*”)] is used to enable Cross Origin Requests from proxies and clients
      • Get the lis aof languages and Websites to retrive only site and language specific caches from the full list of caches as managed by Sitecore.
      • Put the info into a dictionary or any complex JSON object as per you requirement.
      • I used the routing table to map and update the routes to call my service end point.
      • routeCollection.MapRoute(
        name: “Gethtmlcache“,
        url: “cachediagnotics/gethtmlcache/{subsidiarylist}“,
        defaults: new { controller = “cachediagnotics”, action = “gethtmlcache”, subsidiarylist = UrlParameter.Optional },
        namespaces: new[] { “MK.eCommerce.Web.Controllers” });

        routeCollection.MapRoute(
        name: “GetCachAllServers“,
        url: “cachediagnotics/getcacheallservers“,
        defaults: new { controller = “cachediagnotics”, action = “getcacheallservers” },
        namespaces: new[] { “MK.eCommerce.Web.Controllers” });

        routeCollection.MapRoute(
        name: “ClearCacheData“,
        url: “cachediagnotics/clearcachedata“,
        defaults: new { controller = “cachediagnotics”, action = “clearcachedata” },
        namespaces: new[] { “MK.eCommerce.Web.Controllers” });

      • Please see that I added 3 routes – Gethtmlcache(for getting html cache from CD servers), GetCachAllServers(for the proxy service end point to get cache data from all CD servers) and ClearCacheData(to clear the cache data)
      • The server list is iterated through to call the service end point Gethtmlcache and the data retrieve is is hold into a dictionary.
      • I also put the data from all server under a key which the is request time, so that I can show that at what time stamp what was the cache info from all servers.
      • using System.Collections.Generic;
        using System.IO;
        using System.Linq;
        using System.Net;
        using System.Net.Http;
        using System.Web;
        using System.Web.Http.Cors;
        using System.Web.Mvc;

        namespace MyProject.Web.Controllers
        {
        public class CacheDiagnoticsController : GlassController
        {
        [EnableCors(origins: “*”, headers: “*”, methods: “*”)]
        public ActionResult GetHtmlCache(string subsidiaryList)
        {
        var log = global::Sitecore.Diagnostics.LoggerFactory.GetLogger(“LogFileAppender”);
        var dictHtmlCaches = new Dictionary<string, string>();
        try
        {
        // get list of subsidiaries for a specific region
        var lstSubsidiaries = subsidiaryList.Split(new[] {‘,’}, StringSplitOptions.RemoveEmptyEntries).ToList();

        // get cache from a specific server
        var allCaches = Sitecore.Caching.CacheManager.GetAllCaches();

        // filter Html cache only based on subsidiary
        foreach (var subsidiary in lstSubsidiaries)
        {
        var htmlCaches = allCaches.Where(t => t.Name.Contains(“.” + subsidiary.ToLower() + “/website1[html]“) | t.Name.Contains(“.” + subsidiary.ToLower() + “/website2[html]“));
        foreach (var cache in htmlCaches)
        {
        if (cache.Name.Contains(“.” + subsidiary.ToLower() + “/website1[html]”))
        {
        dictHtmlCaches.Add(subsidiary.ToLower() + “-website1“, cache.Size.ToString());
        }
        else if (cache.Name.Contains(“.” + subsidiary.ToLower() + “/website2[html]”))
        {
        dictHtmlCaches.Add(subsidiary.ToLower() + “-website2“, cache.Size.ToString());
        }
        }
        }

        }
        catch (Exception ex)
        {
        log.Info(“CacheDiagnostics.GetHtmlCache. Can’t get the required data, Error Info: ” + ex.Message);
        }

        // serialize and return cache info from the specifc server
        var jsonString = JsonConvert.SerializeObject(dictHtmlCaches, new JsonSerializerSettings { ReferenceLoopHandling = ReferenceLoopHandling.Serialize });
        return this.Content(jsonString, “application/json”);

        }

    • Exposing a proxy service end point on CM servers to communicate with CD servers :
      • As you can see that I am getting the list of servers from a config file.
      • GetCacheAllServers is the proxy call to internally call the Gethtmlcache end point
      • ClearCacheData is used to clear the cache
      • <configuration xmlns:patch=”http://www.sitecore.net/xmlconfig/”&gt;
        <sitecore>
        <!–For Cache Diagnostics settings – starts–>
        <settings>
        <setting name=”SubsidiaryList” value=”MX” />
        <setting name=”ServersList” value=”websitehostname1,websitehostname1” />
        </settings>
        <!–For Cache Diagnostics settings – ends–>
        </sitecore>
        </configuration>

      • using Glass.Mapper.Sc.Web.Mvc;
        using Newtonsoft.Json;
        using System;
        using System.Collections.Generic;
        using System.IO;
        using System.Linq;
        using System.Net;
        using System.Net.Http;
        using System.Web;
        using System.Web.Http.Cors;
        using System.Web.Mvc;

        namespace MK.eCommerce.Web.Controllers
        {
        public class CacheDiagnoticsController : GlassController
        {
        [EnableCors(origins: “*”, headers: “*”, methods: “*”)]
        public ActionResult GetCacheAllServers()
        {
        // variable declarations
        var log = global::Sitecore.Diagnostics.LoggerFactory.GetLogger(“LogFileAppender”);
        var serversList = Sitecore.Configuration.Settings.GetSetting(“ServersList”);
        var subsidiaryList = Sitecore.Configuration.Settings.GetSetting(“SubsidiaryList”);

        try
        {
        List<string> lstServers = new List<string>();
        Dictionary<string, object> dictData = new Dictionary<string, object>();

        // get te list of servers
        if (!string.IsNullOrWhiteSpace(serversList))
        {
        var arrServers = serversList.Split(new[] { ‘,’ }, StringSplitOptions.RemoveEmptyEntries).ToList();
        foreach (var server in arrServers)
        {
        lstServers.Add(server);
        }
        }
        else
        {
        lstServers.Add(System.Environment.MachineName);
        }

        // call the service to get cache info from the server
        string result = string.Empty;
        foreach (var serverName in lstServers)
        {
        var serviceUrl = “http://&#8221; + serverName + “/cachediagnotics/gethtmlcache/” + subsidiaryList.ToLower();

        var request = (HttpWebRequest)WebRequest.Create(serviceUrl);

        request.Method = “GET”;
        request.AutomaticDecompression = DecompressionMethods.Deflate | DecompressionMethods.GZip;
        ServicePointManager.SecurityProtocol = SecurityProtocolType.Tls12;

        try
        {
        result = string.Empty;

        using (var response = (HttpWebResponse) request.GetResponse())
        {
        using (var stream = response.GetResponseStream())
        {
        using (var sr = new StreamReader(stream))
        {
        result = sr.ReadToEnd();
        dictData.Add(serverName, JsonConvert.DeserializeObject<Dictionary<string, string>>(result));
        }
        }
        }
        }
        catch (Exception ex)
        {
        dictData.Add(serverName, new Dictionary<string, object>());
        log.Info(“CacheDiagnostics.GetCacheAllServers. Can’t connect to server ” + serverName + “, Error Info: ” + ex.Message);
        }
        }

        // get cache info from a cookie/session
        var diagnosticCache = Session[“DiagnosticCache”] as Dictionary<string, object>;

        // if there is already exisiting data then add the current data else just show this data
        if (diagnosticCache != null && diagnosticCache.Count > 0)
        {
        diagnosticCache.Add(DateTime.Now.ToString(“MM/dd/yyyy HH:mm:ss.fff tt”), dictData);
        }
        else
        {
        diagnosticCache = new Dictionary<string, object>();
        diagnosticCache.Add(DateTime.Now.ToString(“MM/dd/yyyy HH:mm:ss.fff tt”), dictData);
        }

        // write the data back into the Session
        Session[“DiagnosticCache”] = diagnosticCache;

        // serialize and return cache info to be consumed by clients
        var jsonString = JsonConvert.SerializeObject(diagnosticCache, new JsonSerializerSettings { ReferenceLoopHandling = ReferenceLoopHandling.Serialize });
        return this.Content(jsonString, “application/json”);
        }
        catch (Exception ex)
        {
        log.Info(“CacheDiagnostics.GetCacheAllServers. Can’t get required data, Error Info: ” + ex.Message);
        return null;
        }
        }

        [EnableCors(origins: “*”, headers: “*”, methods: “*”)]
        public ActionResult ClearCacheData()
        {
        var log = global::Sitecore.Diagnostics.LoggerFactory.GetLogger(“LogFileAppender”);
        try
        {
        // write blank data back into the Session
        var diagnosticCache = new Dictionary<string, object>();
        Session[“DiagnosticCache”] = diagnosticCache;

        // serialize and return cache info to be consumed by clients
        var jsonString = JsonConvert.SerializeObject(diagnosticCache, new JsonSerializerSettings { ReferenceLoopHandling = ReferenceLoopHandling.Serialize });
        return this.Content(jsonString, “application/json”);
        }
        catch (Exception ex)
        {
        log.Info(“CacheDiagnostics.ClearCacheData. Can’t get required data, Error Info: ” + ex.Message);
        return null;
        }
        }
        }
        }

    • Developing and AngularJS page on CM servers to consume and show info:
      • Once you have the data in a specific format, you can use AngularJS to call and consume the proxy endpoint to get the data and show
      • The angular page is very simple
      • It calls – $http.get(“/cachediagnotics/getcacheallservers”) to return all CD servers cache info and then use ng-repeat expressions to iterate through the cache data.
      • <%@ Page Language=”C#” AutoEventWireup=”true” CodeBehind=”CacheDiagnostics.aspx.cs” Inherits=”MyProject.Web.Diag.CacheDiagnostics” %>

        <!DOCTYPE html>
        <html>
        <head>
        <title>Cache Diagnostics</title>
        https://ajax.googleapis.com/ajax/libs/angularjs/1.5.7/angular.min.js
        https://ajax.googleapis.com/ajax/libs/jquery/3.1.0/jquery.min.js
        <style>
        body {
        font-family: Helvetica, Arial, Sans-Serif, Verdana;
        font-size: 12px;
        }

        table {
        width: auto;
        float: left;
        border-spacing: 1;
        align-content: center;
        }

        #tblDetails td, #tblDetails th {
        border: 1px solid #CCC;
        height: auto;
        width: auto;
        text-align: center;
        }

        #tblDetails th {
        background: silver;
        }

        #tblDetails td {
        background: whitesmoke;
        }

        #tblMatrix td, #tblMatrix th {
        border: 1px solid #CCC;
        height: auto;
        width: auto;
        text-align: center;
        }

        #tblMatrix th {
        background: silver;
        }

        #tblMatrix td {
        background: whitesmoke;
        }

        #tblMain td, #tblMain th {
        border: 1px solid #CCC;
        height: auto;
        width: auto;
        text-align: left;
        }

        #tblMain th {
        background: silver;
        }

        #tblMain td {
        background: whitesmoke;
        }

        </style>

        angular.module(‘CacheDiagnosticsApp’, [])
        .controller(‘GetHtmlCache’, function ($scope, $http) {
        $(“#tblMain”).hide();

        // get cache info
        $scope.getCacheInfo = function () {
        // call the proxy server method to get cache data
        var dictDataMatrix = {}
        $http.get(“/cachediagnotics/getcacheallservers”)
        .then(function (response) {
        //process dictDataMatrix to compare the last two rows and flag any mismatches
        $scope.dictDataMatrix = response.data;
        });
        $(“#tblMain”).show();
        };

        // reset cache info
        $scope.clearCacheInfo = function () {
        $http.get(“/cachediagnotics/clearcachedata”)
        .then(function (response) {
        $scope.dictDataMatrix = response.data;
        });
        $(“#tblMain”).hide();
        };

        });

        </head>
        <body ng-app=”CacheDiagnosticsApp”>

        Cache Diagnostics Matrix
        Clear Cache Diagnostics Info 
        Get Cache Diagnostics Info
        ng-repeat=”(requesttime, serverdata) in dictDataMatrix track by requesttime”>

        Request DateTime Server Data
        {{requesttime | date : “short”}}
        {{servername}}
        {{cachename}}
        {{(cachesize.replace(‘*’,”))/1000|number}} KB

        </body>
        </html>

    • and here you go, see the output
    • You can see the cache values from 4 CD servers before logging into CD sites( all zeros). The after logging in when the websites generate cache data the values change.
    • From the values you can also tell that Ca-cache is getting generated meaning that canada site is getting accessed and all 3 servers are being used behind the F5 load balancer.
    • It also gives an indication that server 4 is either offline or no in the app pool mix on the load balancer.
    • So this page has become a lot handy for us to see the caching behavior of our CD sites behind the load balancer.
    • From the info below we can report to the DEVOps that website4 is not returning cache data so that they can investigate.
    • Is that helpful for you?
    • Capture


How to handle Deadlocks in Sitecore EventQueue, History and PublishingQueue tables

What was the issue?

  • All of a sudden on a Sunday morning our content editor team started reporting:
    • In the CM servers, the Sitecore items(the beauty products) are not getting published to web database.
    • the same products are not getting updated to Solr Master and thus to Solr slave
    • They also reported that on the CD servers the searches are not showing up the newly updated products.


What is the overall architecture?

  • Our Sitecore implementation receives product notifications though a RabbitMQ notification service where the messages are pooled by the product service(repository of all products)
  • In Sitrecore, we have written a processor to listen to these notifications and update the product features and attributes.
  • Once the updated product feature or attribute is saved in the master database first, then publishing service is called to update it to web database.
  • Finally, re-indexing is executed to update it to Solr Master.
  • The Solr master through the replication process updates it to Solr Slave.
  • While Solr master is used as an indexing destination, Solr slave is used for searches.
  • All this is done through the automated process called as “Notification Service” which is nothing but a listening processor over the pipeline.


What was done to resolve the issue after initial investigation?

  • We checked for any publishing error logs, there were none.
  • We checked for any notification service logs, there were none.
  • We also checked the Solr logs, there were none.
  • We then restarted the publishing service, reset the app pools on the CM and CD servers, reset the Solr master and the slave.


Did this resolve the issue?

  • Yes and No.
  • Yes because when we restart the CM and CD servers, it will use the initialization pipeline processor  to update all the products from the Product service into master and web databases and thus also in Solr master and slave after auot-re-indexing. So we thus saw the new products which were not earlier showing up, they were showing up now.
  • No because, when we tried to update any new products, it was again not showing it up in web databases, Solr master or Solr slave.
  • This was very peculiar scenario that on server reset the products were getting synched the first time but when we tried to update any other product it will not.


What was the root cause then?

  • The products from Sitecore master database were not being saved to web database because of “SQL deadlocking”.
  • The deadlock was killing the save event and thus the product was not getting saved and thus also not reflecting in Solr
  • The tables which were deadlocking in core, master as well as web databases were –
    • EventQueue table,
    • History table and
    • PublishQueue table
  • Sitecore uses these tables to keep track of events, history and publishing and thus know which products to publish or not based on these tables
  • If these tables consists hundreds of thousands of records then it will fail to retrieve the info in timely fashion and thus slowing the CPU and memory and thus resulting in deadlocks.


So what was the final solution?

  • The solution is :
    • you have to prune the data in these 3 tables( say more than 12 hours or so).
    • You can archive any data older than 12 hours in an archive table so that you can reclaim it in case of Disaster recovery.
    • You can also create a job which regularly cleans up data from these 3 tables, archives it in another table and later clean the archive table too say on weekly basis.
    • One of the solutions is mentioned as below
    • Commands to clean the data older than 12 hours
      • Delete data from EventQueue table
        delete FROM [TheDatabase_Master].[dbo].[EventQueue] where [Created] < DATEADD(HOUR, -4, GETDATE())
        delete FROM [TheDatabase_Core].[dbo].[EventQueue] where [Created] < DATEADD(HOUR, -4, GETDATE())
        delete FROM [TheDatabase_Web].[dbo].[EventQueue] where [Created] < DATEADD(HOUR, -4, GETDATE())

        Delete data from History table
        delete FROM [TheDatabase_Core].[dbo].[History] where Created < DATEADD(HOUR, -12, GETDATE())
        delete FROM [TheDatabase_Master].[dbo].[History] where Created < DATEADD(HOUR, -12, GETDATE())
        delete FROM [TheDatabase_Web].[dbo].[History] where Created < DATEADD(HOUR, -12, GETDATE())

        Delete data from Publishqueue table
        delete FROM [TheDatabase_Core].[dbo].[PublishQueue] where Date < DATEADD(HOUR, -12, GETDATE());   
        delete FROM [TheDatabase_Master].[dbo].[PublishQueue] where Date < DATEADD(HOUR, -12, GETDATE());
        delete FROM [TheDatabase_Web].[dbo].[PublishQueue] where Date < DATEADD(HOUR, -12, GETDATE());

  • After cleaning the databases, we saw that the dead locks were gone and now the data was saving into the master and web database as well as the Solr master and slave. This resolved our issue.

How to setup and automate Sitecore new Publishing service

Why?

  • Sitecore has released a new Sitecore publishing module which is a vast improvement over its old “Sitecore Publish” option.
  • It is now an independent service running in IIS with its security credentials
  • Its helps-
    • publish items faster, specially
    • bulk publishing
    • repair publish
    • has a better user interface and tells which publishes are complete or in queue, who ran the publish and what items are being published
  • It consists of-
    • Publishing Host – an independent service under IIS for publishing the items
    • Publishing Module – The user interface

How to automate or setup?

  • Its consists of steps which you can run manually or automate using PowerShell or any other language. I am using the automated process using a PowerShell file
  • The 4 major steps in setup or automation:
    • Installing DotNetCore module
    • Installing Publishing Host
    • Installing Publishing Module
    • Setup database user permissions
    • Update database schema and Add Database user
  • Please download this file and save it on your local server – https://testbucket786786.s3.amazonaws.com/sitecore/Publishing%20Service%20Setup/PublishingServiceSetup.ps1
  • Execute by typing .\PublishingServiceSetup.ps1
  • Now run the publishing service from the Sitecore control panel
  • You can see the new publishing service UI now
    • Capture
  • The code and its explanation(inline in the code) –
    • #requires -version 4.0
      #requires -RunAsAdministrator
      import-module webadministration

      # This script must be executed after you have installed a working Sitecore Instance

      & {iisreset}

      ##########################################################################################################

      # Step 1 – Installation of DotNetCore module – it will install the .DotNetCore module and its prerequisites
      # required prerequisites and the .DonetCore module are at the location – https://testbucket786786.s3.amazonaws.com/sitecore/Publishing%20Service%20Setup/Softs/
      $theSoftwareSource=’https://testbucket786786.s3.amazonaws.com/sitecore/Publishing%20Service%20Setup/Softs&#8217;

      # website Names
      $sitecoreInstanceName = “TheSitecoreWebsiteName” # change the “TheSitecoreWebsiteName” to the actual website Name
      $publishingWebsiteName= “ThePublishWebsiteName” # change the “ThePublishWebsiteName” to the actual publish website Name

      #web sites Paths
      $sitecoreInstancePath = “D:\Sitecore\$sitecoreInstanceName”
      $publishingWebsitePath = “D:\Sitecore\publishingWebsiteName”

      # app pool user names
      $theWebsiteAppPoolUserName = IIS AppPool\websitename.com # this the the name of the IIS App pool website username
      $thePublishWebsiteAppPoolUserName = IIS AppPool\publish.website.com # this the the name of the IIS App pool publish username

      function InstallPackage($theFolder, $thePackage){

      $theProcess = Start-Process $thePackage -WorkingDirectory $theFolder -ArgumentList “/q /norestart” -Verb RunAs -Wait -PassThru
      if ($theProcess.ExitCode -eq 0) {
      Write-Host “Installation completed for package: $thePackage”
      }
      else {
      Write-Error “An error was encountered during the installation. .NET Release after installation of package: $thePackage”
      }

      }

      $theDotNetCoreHostingModule = Get-WebGlobalModule | where-object { $_.name.ToLower() -eq “aspnetcoremodule” }
      if (!$theDotNetCoreHostingModule)
      {
      Write-Host “Installing .Net Core Module”

      $theDestination=’D:\PublishingDServicesSofts’
      Copy-Item -Recurse -Filter *.* -path $theSoftwareSource -destination $theDestination -Force

      $workingDirectory = “D:\deploy\Installers\publishing service”
      $theVCRedistPackage = “vc_redist.x64.exe”
      $theDotNetCoreRuntimePackage = “dotnet-win-x64.1.1.2.exe”
      $theDetNetCoreHostingPackage = “DotNetCore.1.0.5_1.1.2-WindowsHosting.exe”

      InstallPackage $workingDirectory $theVCRedistPackage
      InstallPackage $workingDirectory $theDetNetCoreHostingPackage

      }
      else {
      Write-Host “.DontNetCore installation successful”
      }

      ##########################################################################################################

      # Step 2 – Installation of Publishing service Host


      RemovePublishingServiceWebsite
      CreatePublishingServiceWebsite “admin” “b” # this would be a non admin/b credentials for non default/local instances
      DeployPublishingServiceFiles

      function RemovePublishingServiceWebsite() {
      $SitecoreWebsiteInstanceName = $sitecoreInstanceName
      # removing web site from IIS
      if (test-path “IIS:\Sites\$SitecoreWebsiteInstanceName”) {
      write-host “Removing Website $SitecoreWebsiteInstanceName”
      & “$($env:windir)\system32\inetsrv\AppCmd.exe” Stop Site “`”$SitecoreWebsiteInstanceName`””
      remove-website -name “$SitecoreWebsiteInstanceName”
      }

      # removing app pool from IIS
      if (test-path “IIS:\AppPools\$SitecoreWebsiteInstanceName”) {
      write-host “Removing AppPool $SitecoreWebsiteInstanceName”
      & “$($env:windir)\system32\inetsrv\AppCmd.exe” Stop AppPool “`”$SitecoreWebsiteInstanceName`””
      remove-webapppool -name “$SitecoreWebsiteInstanceName”
      }

      & {iisreset}
      }

      function DeployPublishingServiceFiles() {
      $sitecoreInstanceRoot = sitecoreInstancePath
      if (!(test-path $sitecoreInstanceRoot)) {
      unzip $($theSoftwareSource\\Sitecore Publishing Service 2.1.0 rev. 171009.zip) $sitecoreInstanceRoot
      unzip $($theSoftwareSource\\Sitecore Publishing Module 2.1.0 rev. 171009.update) $sitecoreInstanceRoot
      }
      }

      function CleanPublishingServiceBindings() {
      $SitecoreWebsiteInstanceName = sitecoreInstanceName
      $website = get-website |? { $_.name -eq $SitecoreWebsiteInstanceName -and $_.bindings.collection.count -ne 0 }
      if ($website) { get-webbinding -name $SitecoreWebsiteInstanceName | remove-webbinding }
      }

      function UpdatePublishingServiceBindings([hashtable] $config) {
      $sitecoreInstanceRoot = sitecoreInstancePath
      $SitecoreWebsiteInstanceName = sitecoreInstanceName
      $hostNames = sitecoreInstanceName

      & “$($env:windir)\system32\inetsrv\AppCmd.exe” Stop Site “`”$SitecoreWebsiteInstanceName`””

      # remove bindings
      CleanPublishingServiceBindings

      # create bindings
      write-host “Creating bindings for $SitecoreWebsiteInstanceName”
      new-webbinding -name $SitecoreWebsiteInstanceName -protocol http -port 80 -ipaddress “*” -hostheader $config.hostNames[0]

      & “$($env:windir)\system32\inetsrv\AppCmd.exe” Start Site “`”$SitecoreWebsiteInstanceName`””
      #start-website $SitecoreWebsiteInstanceName
      }
      function CreatePublishingServiceWebsite([string] $theWebsiteAppPoolUserName, [string] $runtimeAccountPassword) {
      $sitecoreInstanceRoot = sitecoreInstancePath
      $SitecoreWebsiteInstanceName = sitecoreInstanceName

      # remove existing site if it exists
      RemovePublishingServiceWebsite

      # create app pool
      write-host “Creating app pool for $SitecoreWebsiteInstanceName”

      $appPool = “IIS:\AppPools\$SitecoreWebsiteInstanceName”
      new-webAppPool -name “$SitecoreWebsiteInstanceName”

      $pool = get-item $appPool
      $pool.startMode = ‘AlwaysRunning’
      set-item $appPool $pool

      set-itemProperty -Path $appPool -Name managedRuntimeVersion -value “”
      set-itemProperty -Path $appPool -Name recycling.disallowOverlappingRotation -Value $true
      set-itemProperty -Path $appPool -Name processModel.idleTimeout -value ([TimeSpan]::FromMinutes(0))
      set-itemProperty -Path $appPool -Name recycling.periodicrestart.time -value ([TimeSpan]::FromMinutes(0))

      # set the app pool identity
      if ([string]::IsNullOrEmpty($theWebsiteAppPoolUserName) -or [string]::IsNullOrEmpty($runtimeAccountPassword)) {
      set-itemProperty -path $appPool -Name processModel.identityType -Value 4 # AppPoolIdentity
      } else {
      set-itemProperty -Path $appPool -Name processModel.identityType -Value 3 # Specific User
      set-itemProperty -Path $appPool -Name processModel.userName -Value $theWebsiteAppPoolUserName
      set-itemProperty -Path $appPool -Name processModel.password -Value $runtimeAccountPassword
      }

      # create web site
      write-host “Creating website $SitecoreWebsiteInstanceName”
      $id = (dir iis:\sites | foreach {$_.id} | sort -Descending | select -first 1) + 1
      new-webSite -name $SitecoreWebsiteInstanceName -physicalpath “$sitecoresitecoreInstanceRoot” -port 80 -applicationpool $SitecoreWebsiteInstanceName -Id $id

      # update bindings
      UpdatePublishingServiceBindings
      }

      ##########################################################################################################

      # Step 3 – Add Database users

      $dbInstance = “.” # referes to the current default local instance, for non-local instances, give actual name of the named db instance
      $dbServer = new-object Microsoft.SqlServer.Management.Smo.Server($sqlConfig.server)

      AddDatabaseUser $dbServer core $thePublishWebsiteAppPoolUserName
      AddDatabaseUser $dbServer master $thePublishWebsiteAppPoolUserName
      AddDatabaseUser $dbServer web $thePublishWebsiteAppPoolUserName
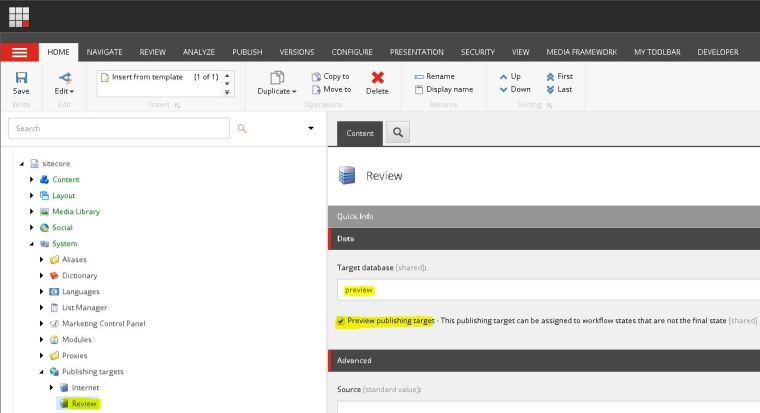
      AddDatabaseUser $dbServer preview $thePublishWebsiteAppPoolUserName
      AddDatabaseUser $dbServer reporting $thePublishWebsiteAppPoolUserName

      function AddDatabaseUser($databaseServer, $databaseName, $userName)
      {
      if (test-database $databaseServer $databaseName) {
      # if login doesn exist at the database level the create it
      if (!(($databaseServer.logins).Name -contains $userName)) {
      write-host “Adding database user $userName”
      $login = new-object Microsoft.SqlServer.Management.Smo.Login($databaseServer,$userName)
      $login.loginType = ‘WindowsUser’
      $login.create()
      }

      # add the user to the database
      $db = $databaseServer.databases[$databaseName]
      if (!(($db.users).Name -contains $userName)) {
      write-host “Adding $userName to database $databaseName”
      $user = new-object Microsoft.SqlServer.Management.Smo.User($db,$userName)
      $user.login = $userName
      $user.create()

      # grant db_owner permissions
      write-host “Adding db_owner permission for $userName to database $databaseName”
      $db.roles[‘db_owner’].addMember($userName)
      }
      } else {
      write-warning “$databaseName does not exist”
      }
      }

      ##########################################################################################################

      # Step 4 – Update Database schema
      if(test-path $publishingWebsitePath) {
      write-host “Updating Schema by executing $publishingWebsitePath\Sitecore.Framework.Publishing.Host.exe schema upgrade –force”
      Invoke-Expression “$publishingWebsitePath\Sitecore.Framework.Publishing.Host.exe schema upgrade –force”
      & {iisreset}
      }

      ##########################################################################################################
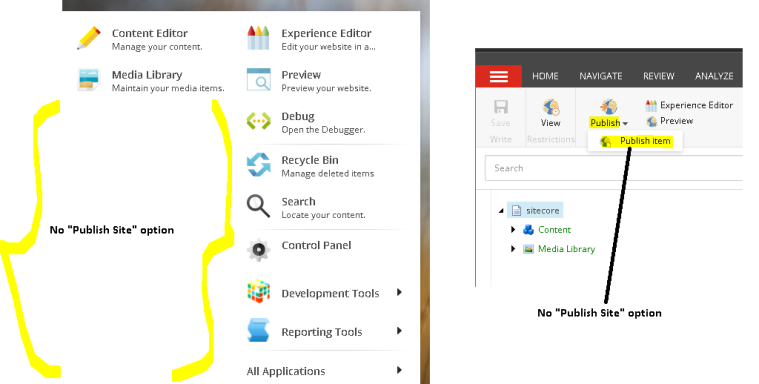
      # Step 5 – Update Publishing service UI
      $thePublishingServiceFilesSource=’$theSoftwareSource/Sitecore_PublishingService_files.7z’
      if ((test-path “$sitecoreInstancePath\website”)) {
      write-host “Copying Publishing service files to $sitecoreInstancePath\website”
      unzip $thePublishingServiceFilesSource “$sitecoreInstancePath\website”
      }

      & {iisreset}

      ##########################################################################################################

Security Hardening of admin pages in Sitecore

  • Scenario:
  • Solutions:
    • There are many method which can be used for security hardening of Sitecore admin pages but URL Rewrite is one of the easiest to implement.
    • First of all the the URL Rewrite module on the IIS must be installed.
    • Now in your web.config file in the “rewrite” section add the below rules
      • In the rule you are defining the match pattern that if the URL contains sitecore/admin, sitecore/login, sitecore/diag, sitecore/debug, sitecore/shell or sitecore/, then redirect to the CD login page if the condition that the URL matches the EXTERNAL website URL. If the condition of EXTERNAL URL does not match, let the user open these admin pages using INTERNAL URL)
      • <rewrite>
        <rules>
        <rule name=”Disable Admin tool stopProcessing=”true>
        <match url=”^sitecore/(admin|login|diag|debug|shell).*[^s]*$/>
        <action type=”Redirect url=”https://{HTTP_HOST}/Login/Login.aspx appendQueryString=”false/>
        <conditions>
        <add input=”{HTTP_HOST} pattern=”Your_Website_ExternalDNSName/>
        </conditions>
        </rules>

        </rewrite>


Adding new Rendering to Presentation details using PowerShell

  • Adding/Removing/Updating the presentation details of a page is very easy to implement using a PowerShell script
  • First of all you can get the list of pages where you want to add the new rendering using Get-Item and/or Get-ChildItem
  • Then for each such page use “Get-Rendering” method to check if the rendering which you want to add is present or not.
  • Then add the new rendering using “Add-Rendering” method.
  • Please see the example below
  • cd “master:/sitecore”
    $db = “master:”
    $newRenderingInstance = gi -Path “master:/sitecore/layout/Renderings/MyNewHeaderRendering” | New-Rendering

    function GetAllPages() {
    $homePage = Get-Item -Path ($db + “/Sitecore/Content/Home”) -Language *
    $pages = Get-ChildItem -Path ($db + “/Sitecore/Content/Home”) -Recurse -Language *
    $pages += $homePage
    $pages | ? { $_ -ne $null } `
    | % {
    AddMyNewHeaderRendering $_
    }
    }

    function AddMyNewHeaderRendering ($page){
    $renderings = $page | Get-Rendering -ErrorAction SilentlyContinue
    if($renderings -ne $null -and $renderings.length -gt 1 -and $newRenderingInstance.Id -notin $renderings.ItemID ){
    Add-Rendering -Item $page -Rendering $newRenderingInstance -Index 1 -Placeholder “header”
    }
    }


    GetAllPages

How to show or hide “Publish Site” to prevent accidental Site Publish

The Problem: 

One of the CM site users went to the content tree and from the ribbon published the whole site. Now two things might happen

  • the CM site is executing a full site publish and thus can be slow responsive for a specific period of time.
  • a lot of unwanted items ( if proper work flow was not implemented ) will also get published

So what should be done is this scenario?

The Solution:

Its a permission related thing. You can either deny or allow depending on your needs.

The Sitecore role which handles publish related activities is “Sitecore\Sitecore Client Publishing” you have to deny/grant “READ” permission to this user to for the paths – “/sitecore/content/Applications/Content Editor/Menues/Publish/Publish Site” and “/sitecore/content/Documents and settings/All users/Start menu/Left/Publish Site”.

Here are the steps:

Step 1: Switch to “core” database from Sitecore Desktop

Step 2: Open “Access Viewer” and go to : “/sitecore/content/Applications/Content Editor/Menues/Publish/Publish Site” .  Click on “Assign” button in the ribbon to open “Assign Security Rights” properties window. Select the role “Sitecore\Sitecore Client Publishing” and click on the “X”(deny) for “READ” permission.

Stop publish site from ribbon

Step 3: Similarly go to : “/sitecore/content/Documents and settings/All users/Start menu/Left/Publish Site” .  Click on “Assign” button in the ribbon to open “Assign Security Rights” properties window. Select the role “Sitecore\Sitecore Client Publishing” and click on the “X”(deny) for “READ” permission.

Stop publish site from start menu

Step 4: You are done. Go ahead and see that in the ribbon as well as the start menu the “Publish Site” option is not available.

start menu no publish option

How to add pages, controls, templates, renderings to Sitecore

Scenario 1:

Adding a control to a page using a view rendering:

  1. In the Sitecore CMS, first of all lets select a location where we want to add a page – E.g. let’s go to “/sitecore/content/MyProject/Home/Training” and create a page “Exercise 1

  2. Now that the page is defined we need to create the required control(s) to be shown on this page, we will use “View rendering” to create a control.

  3. Now let’s go to “/sitecore/layout/Renderings” and select a path where we can create our rendering. E.g. let’s use – “/sitecore/layout/Renderings//Content

  4. Add a “view rendering” named “Static page”  with a path – “/Views/eCommerce/Renderings/Content/StaticPage.cshtml

  1. Now let’s go to Visual Studio and add a “view” named “Staticpage.cshtml” in project/path – “MyProject\Views\Renderings\Content” and add some content to the page.

  1. Save and publish the view.

  1. Now, go back to Sitecore CMS and add this view rendering “Static page” in the Presentation Details of Exercise 1 page.

  1. See how to add this view rendering “Static page” in the Presentation Details of the Exercise 1 page:

  • The output is as follows:


Scenario 2:

Adding a control to a page using a view rendering with Model:

  1. In the Sitecore CMS, first of all lets select a location where we want to add a page – E.g. let’s go to “/sitecore/content/MyProject/Home/Training” and create a page “Exercise 2”

  2. Now that the page is defined we need to create the required control(s) to be shown on this page, we will use “View rendering” to create a control.

  3. Now let’s go to “/sitecore/layout/Renderings” and select a path where we can create our rendering. E.g. let’s use – “/sitecore/layout/Renderings//Content

  4. Add a “view rendering” named “Static page With Model”  with a path – “/Views/eCommerce/Renderings/Content/StaticPageWithModel.cshtml

  1. Please see the change in this view rendering that we have also defined a path to a model – “/sitecore/layout/Models//Objects/Static Page With Model
  2. The model is as below. Please see that we have define the ‘Model Type’ as ‘MyProject.Models.ObjectTemplates.StaticPageWithModel,MyProject.Models

  1. Now as the type is defined, we need to create the actual template to represent that type. So here is the template named ‘Static Page With Model’ which has few fields/properties as shown in the builder.

  1. Now as you have created the required rendering, the model and the template, don’t forget to do these 3 things:
    • Sync all these newly created Sitecore items to your project.
    • Build and deploy the ‘MyProject.TDS.Models’ project.

  1. Now let’s go to Visual Studio and add a “view” named “StaticpageWithModel.cshtml” in project/path – “MyProject\Views\Renderings\Content” and add model based content to the page. Please note that this model can be populated/hydrated from any controller e.g. an Angular Controller or a MVC controller or just by inline hydration as shown below.

  1. Save and publish the view in Visual Studio.

  2. Now, go back to Sitecore CMS and add this view rendering “Static page with Model” in the Presentation Details of Exercise 2 page.
  3. See how to add this view rendering “Static page with Model” in the Presentation Details of the Exercise 1 page:

  • The output is as follows:


Scenario 3:

Adding a control to a page using a view rendering with Controller:

  1. In the Sitecore CMS, first of all lets select a location where we want to add a page – E.g. let’s go to “/sitecore/content/MyProject/Home/Training” and create a page “Exercise 3”

  2. Now that the page is defined we need to create the required control(s) to be shown on this page, we will use “Controller rendering” to create a control.

  3. Now let’s go to “/sitecore/layout/Renderings” and select a path where we can create our rendering. E.g. let’s use – “/sitecore/layout/Renderings//Content

  4. So let’s create a controller rendering as below.

  1. Now that we have created a placeholder control, we will use create required models, controllers and views.
  2. First of all lets go to “/sitecore/templates/MyProject/Object Templates/” to create a template which will define what data we need to show( something like a class). Let’s create a template named ‘StaticPageData’ derived from standard template and we will add fields to it. We added 3 firlds ‘HeaderLine’, ‘SubHeaderLine’ and ‘MessageLine’ to the template.

  1. Now we will add a content item derived from the ‘StaticPageData’ template ( something like object of a class). Let’s go to ‘/sitecore/content/MyProject/Reusable Content’ and follow step 1 to 8 as in the snapshot below to create ‘StaticPageData’ content and populate the 3 fields

  1. Now you are ready to sync your changes from Sitecore CMS into your Visual Studio models project.

  1. “Re-Generate” code for all items as shown above.
  1. Now add a model named ‘StaticPageModel’ to the “Models” folder of project “MyProject”.

  1. Then also add a controller named ‘StaticPageController’ to the “controllers” folder of project “MyProject”.

  1. Now let’s go to Visual Studio and add a “view” named “StaticpageWithController.cshtml” in project/path – “MyProject\Views\Renderings\Content” and add some content to the page.

  1. Now build the projects and deploy (better to build deploy whole solution and models)
  2. Now, go back to Sitecore CMS and add the controller rendering “Static page with controller” in the Presentation Details of Exercise 3 page.
  1. See how to add this view rendering “Static page with controller” in the Presentation Details of the Exercise 3 page:

  • The output is as follows:

How to setup your site in “Live” Mode OR How can I review my site even before publishing (i.e. just after saving)? OR How can I preview items in workflow before they are approved?


The Problem:

How to setup your site in “Live” Mode

OR

How can I review my site even before publishing (i.e. just after saving)?

OR

How can I preview items in workflow before they are approved?

This is one of the basic requirements for the content editors to review the site just after they have saved the item/page and before publishing it to web.

The Solution no.1 

Override GetMediaUrl in MediaProvider


namespace NaeemSpace.CustomMediaProviders
{

public class MediaProvider : global::Sitecore.Resources.Media.MediaProvider
{
public override string GetMediaUrl(MediaItem item, MediaUrlOptions options)
{
var retUrl = base.GetMediaUrl(item, options);

var query = System.Web.HttpContext.Current.Request.QueryString;
if (query[“sc_mode”] != null)
{
return retUrl + “&sc_mode=” + query[“sc_mode”];
}
else
{
return retUrl;
}

}

}

Update the mediaProvider section in config

<mediaProvider type=”NaeemSpace.CustomMediaProviders.MediaProvider, NaeemSpace.CustomMediaProviders” patch:instead=”mediaProvider[@type=’Sitecore.Resources.Media.MediaProvider, Sitecore.Kernel’]”/>

and ensure the setting “Preview Publishing target” is checked for the preview publishing target. This will ensure that the workflow items not in the final workflow can be published in the preview website and the querystring “sc_mode=preview” will ensure that you are viewing the item from preview database.

Capture

The Solution no 2:

Sitecore provides an out of box functionality to accomplish this.

You need to setup a “review” website with some proper filters so that you can review our changes before publish or even if your workflow items are not approved state.

“Review” site/mode is also called as “Live” Mode (purely meaning that you are not live but are viewing the site as if it is live.

In the review site the items are visible as soon as you save the item.

To your ‘<Sites>’  config uration  section add a review site

<site name=”preview_website” hostName=”preview.website.com” virtualFolder=”/” physicalFolder=”/” rootPath=”/sitecore/content” startItem=”/home” database=”master” domain=”extranet” allowDebug=”true” cacheHtml=”true” htmlCacheSize=”10MB” registryCacheSize=”0″ viewStateCacheSize=”0″ xslCacheSize=”5MB” filteredItemsCacheSize=”2MB” enablePreview=”true” enableWebEdit=”true” enableDebugger=”true” disableClientData=”false” filterItems=”false” enableWorkflow=”true” />

database=”master” will ensure that the contents are loaded from master website

filterItems=”false” will ensure that’s items are not filtered

enableWorkflow=”true” will ensure that it will manage workflow items too.

Any caveats:

Yes this functionality comes up with following restrictions or a caveat

  • It will display only “publishable” items. ( I will not call it as a caveat as the site respects any publishing restrictions including workflow status, item and version visibility)
  • Caching Implications/Restrictions – the live site can’t cache rendering outputs and controls. So you need to clear up the cache as you view the site and

any search indexes pointing to web might not work.

How to fix the following rendering errors on saving an item

How to fix the following rendering errors on saving an item

  • “The item contains broken links in these fields: – _Renderings
  • or “The item contains broken links in these fields: – _Final Renderings

Source of error:

  • The error happens because in the presentation details of the item some control has an invalid data-source or has a missing place holder settings
  • Especially if you are not watching the item in Raw Mode and still you see a Raw GUID for the data source or place holder then that is exactly the issue.

How to fix it:

  • First of all open the item’s presentation details by clicking the “presentation” tab on the ribbon and then click on “Details” button to open the layout details.
  • Click the shared/final layout as the case may be and then “edit” link to edit the layout.

pic 01 - layout details

  • Now select controls one by one and press “edit” to check if which control has a messed up data source or placeholder setting.

pic 02 - edit layout details

  • See, that for the header control, the field Order Link is showing a GUID data source although we are not viewing it in raw mode. Simply press “Clear” and use “Insert Link” or other options there to update the link and save . You are good to go.

pic 03 - clear and update datasource