How to show or hide “Publish Site” to prevent accidental Site Publish

The Problem: 

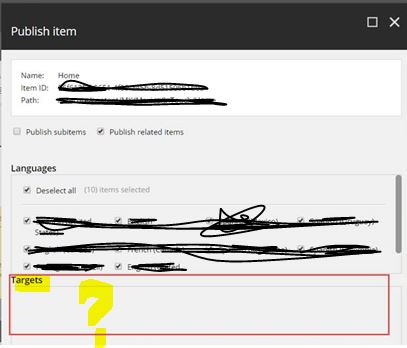
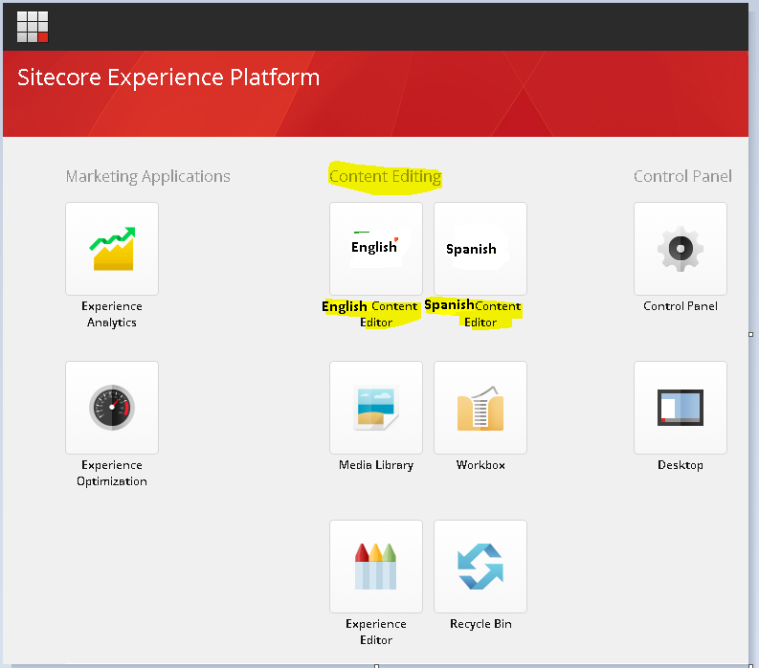
One of the CM site users went to the content tree and from the ribbon published the whole site. Now two things might happen

  • the CM site is executing a full site publish and thus can be slow responsive for a specific period of time.
  • a lot of unwanted items ( if proper work flow was not implemented ) will also get published

So what should be done is this scenario?

The Solution:

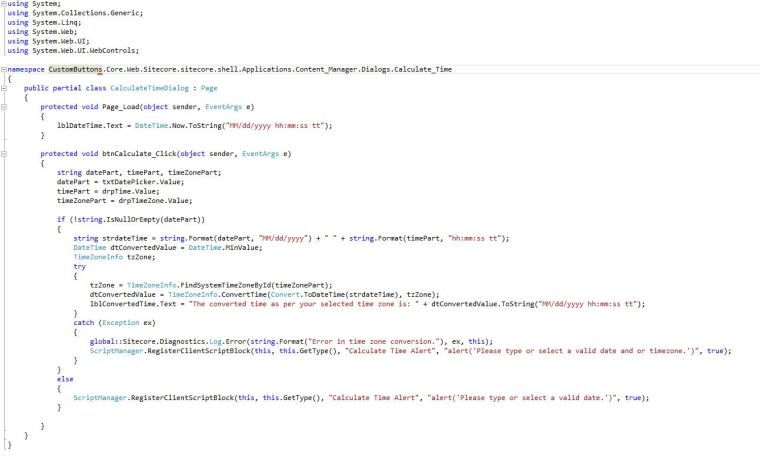
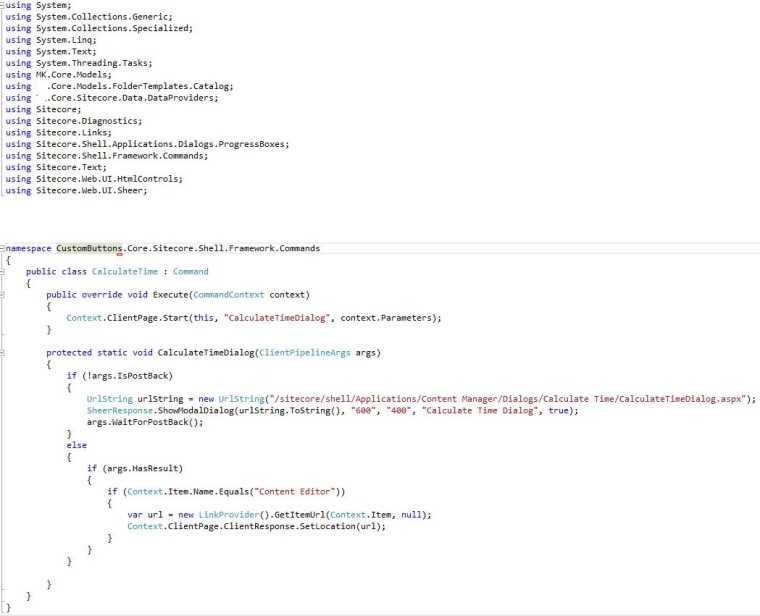
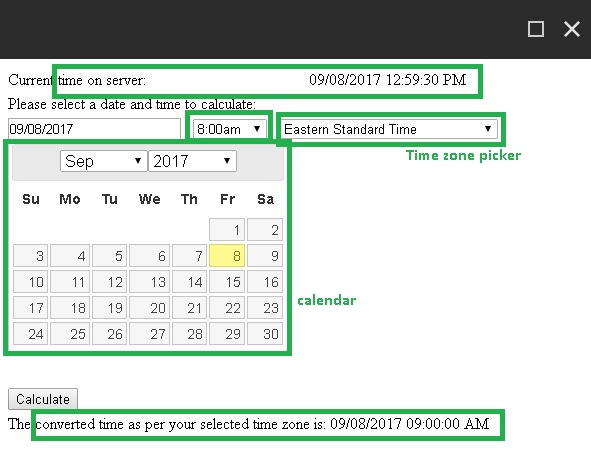
Its a permission related thing. You can either deny or allow depending on your needs.

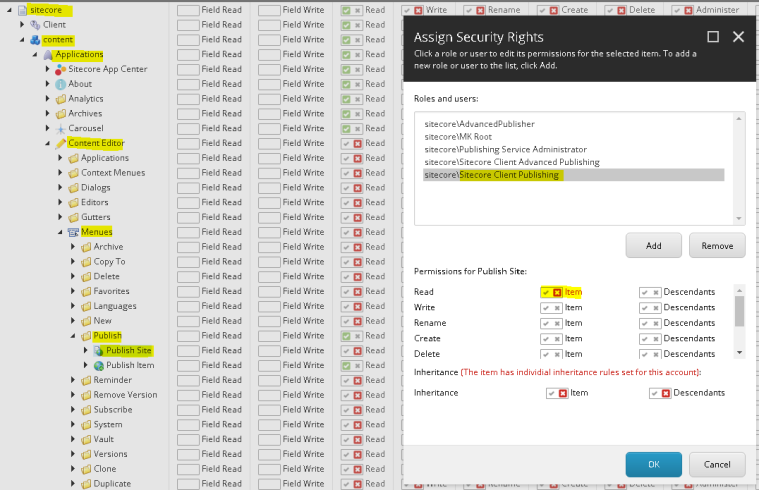
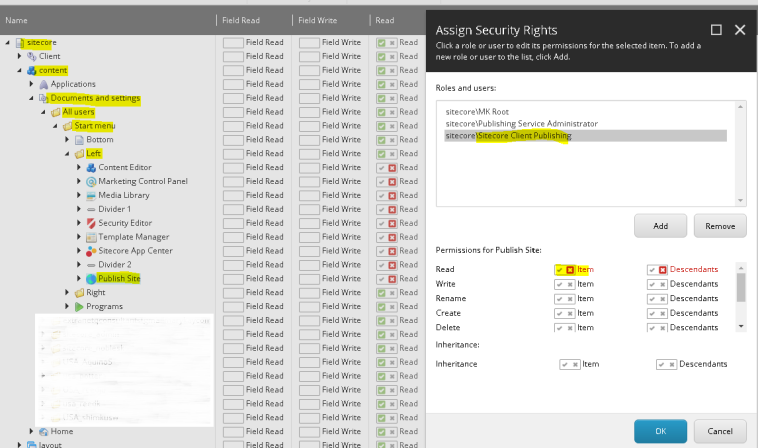
The Sitecore role which handles publish related activities is “Sitecore\Sitecore Client Publishing” you have to deny/grant “READ” permission to this user to for the paths – “/sitecore/content/Applications/Content Editor/Menues/Publish/Publish Site” and “/sitecore/content/Documents and settings/All users/Start menu/Left/Publish Site”.

Here are the steps:

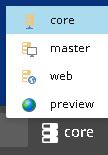
Step 1: Switch to “core” database from Sitecore Desktop

Step 2: Open “Access Viewer” and go to : “/sitecore/content/Applications/Content Editor/Menues/Publish/Publish Site” .  Click on “Assign” button in the ribbon to open “Assign Security Rights” properties window. Select the role “Sitecore\Sitecore Client Publishing” and click on the “X”(deny) for “READ” permission.

Stop publish site from ribbon

Step 3: Similarly go to : “/sitecore/content/Documents and settings/All users/Start menu/Left/Publish Site” .  Click on “Assign” button in the ribbon to open “Assign Security Rights” properties window. Select the role “Sitecore\Sitecore Client Publishing” and click on the “X”(deny) for “READ” permission.

Stop publish site from start menu

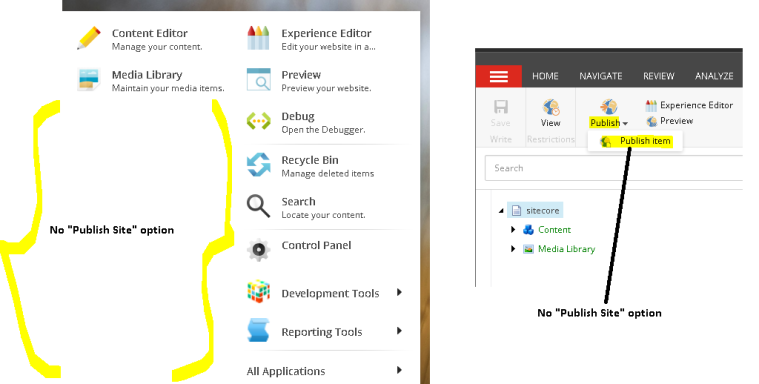
Step 4: You are done. Go ahead and see that in the ribbon as well as the start menu the “Publish Site” option is not available.

start menu no publish option

How to add pages, controls, templates, renderings to Sitecore

Scenario 1:

Adding a control to a page using a view rendering:

  1. In the Sitecore CMS, first of all lets select a location where we want to add a page – E.g. let’s go to “/sitecore/content/MyProject/Home/Training” and create a page “Exercise 1

  2. Now that the page is defined we need to create the required control(s) to be shown on this page, we will use “View rendering” to create a control.

  3. Now let’s go to “/sitecore/layout/Renderings” and select a path where we can create our rendering. E.g. let’s use – “/sitecore/layout/Renderings//Content

  4. Add a “view rendering” named “Static page”  with a path – “/Views/eCommerce/Renderings/Content/StaticPage.cshtml

  1. Now let’s go to Visual Studio and add a “view” named “Staticpage.cshtml” in project/path – “MyProject\Views\Renderings\Content” and add some content to the page.

  1. Save and publish the view.

  1. Now, go back to Sitecore CMS and add this view rendering “Static page” in the Presentation Details of Exercise 1 page.

  1. See how to add this view rendering “Static page” in the Presentation Details of the Exercise 1 page:

  • The output is as follows:


Scenario 2:

Adding a control to a page using a view rendering with Model:

  1. In the Sitecore CMS, first of all lets select a location where we want to add a page – E.g. let’s go to “/sitecore/content/MyProject/Home/Training” and create a page “Exercise 2”

  2. Now that the page is defined we need to create the required control(s) to be shown on this page, we will use “View rendering” to create a control.

  3. Now let’s go to “/sitecore/layout/Renderings” and select a path where we can create our rendering. E.g. let’s use – “/sitecore/layout/Renderings//Content

  4. Add a “view rendering” named “Static page With Model”  with a path – “/Views/eCommerce/Renderings/Content/StaticPageWithModel.cshtml

  1. Please see the change in this view rendering that we have also defined a path to a model – “/sitecore/layout/Models//Objects/Static Page With Model
  2. The model is as below. Please see that we have define the ‘Model Type’ as ‘MyProject.Models.ObjectTemplates.StaticPageWithModel,MyProject.Models

  1. Now as the type is defined, we need to create the actual template to represent that type. So here is the template named ‘Static Page With Model’ which has few fields/properties as shown in the builder.

  1. Now as you have created the required rendering, the model and the template, don’t forget to do these 3 things:
    • Sync all these newly created Sitecore items to your project.
    • Build and deploy the ‘MyProject.TDS.Models’ project.

  1. Now let’s go to Visual Studio and add a “view” named “StaticpageWithModel.cshtml” in project/path – “MyProject\Views\Renderings\Content” and add model based content to the page. Please note that this model can be populated/hydrated from any controller e.g. an Angular Controller or a MVC controller or just by inline hydration as shown below.

  1. Save and publish the view in Visual Studio.

  2. Now, go back to Sitecore CMS and add this view rendering “Static page with Model” in the Presentation Details of Exercise 2 page.
  3. See how to add this view rendering “Static page with Model” in the Presentation Details of the Exercise 1 page:

  • The output is as follows:


Scenario 3:

Adding a control to a page using a view rendering with Controller:

  1. In the Sitecore CMS, first of all lets select a location where we want to add a page – E.g. let’s go to “/sitecore/content/MyProject/Home/Training” and create a page “Exercise 3”

  2. Now that the page is defined we need to create the required control(s) to be shown on this page, we will use “Controller rendering” to create a control.

  3. Now let’s go to “/sitecore/layout/Renderings” and select a path where we can create our rendering. E.g. let’s use – “/sitecore/layout/Renderings//Content

  4. So let’s create a controller rendering as below.

  1. Now that we have created a placeholder control, we will use create required models, controllers and views.
  2. First of all lets go to “/sitecore/templates/MyProject/Object Templates/” to create a template which will define what data we need to show( something like a class). Let’s create a template named ‘StaticPageData’ derived from standard template and we will add fields to it. We added 3 firlds ‘HeaderLine’, ‘SubHeaderLine’ and ‘MessageLine’ to the template.

  1. Now we will add a content item derived from the ‘StaticPageData’ template ( something like object of a class). Let’s go to ‘/sitecore/content/MyProject/Reusable Content’ and follow step 1 to 8 as in the snapshot below to create ‘StaticPageData’ content and populate the 3 fields

  1. Now you are ready to sync your changes from Sitecore CMS into your Visual Studio models project.

  1. “Re-Generate” code for all items as shown above.
  1. Now add a model named ‘StaticPageModel’ to the “Models” folder of project “MyProject”.

  1. Then also add a controller named ‘StaticPageController’ to the “controllers” folder of project “MyProject”.

  1. Now let’s go to Visual Studio and add a “view” named “StaticpageWithController.cshtml” in project/path – “MyProject\Views\Renderings\Content” and add some content to the page.

  1. Now build the projects and deploy (better to build deploy whole solution and models)
  2. Now, go back to Sitecore CMS and add the controller rendering “Static page with controller” in the Presentation Details of Exercise 3 page.
  1. See how to add this view rendering “Static page with controller” in the Presentation Details of the Exercise 3 page:

  • The output is as follows:

How to setup your site in “Live” Mode OR How can I review my site even before publishing (i.e. just after saving)? OR How can I preview items in workflow before they are approved?


The Problem:

How to setup your site in “Live” Mode

OR

How can I review my site even before publishing (i.e. just after saving)?

OR

How can I preview items in workflow before they are approved?

This is one of the basic requirements for the content editors to review the site just after they have saved the item/page and before publishing it to web.

The Solution no.1 

Override GetMediaUrl in MediaProvider


namespace NaeemSpace.CustomMediaProviders
{

public class MediaProvider : global::Sitecore.Resources.Media.MediaProvider
{
public override string GetMediaUrl(MediaItem item, MediaUrlOptions options)
{
var retUrl = base.GetMediaUrl(item, options);

var query = System.Web.HttpContext.Current.Request.QueryString;
if (query[“sc_mode”] != null)
{
return retUrl + “&sc_mode=” + query[“sc_mode”];
}
else
{
return retUrl;
}

}

}

Update the mediaProvider section in config

<mediaProvider type=”NaeemSpace.CustomMediaProviders.MediaProvider, NaeemSpace.CustomMediaProviders” patch:instead=”mediaProvider[@type=’Sitecore.Resources.Media.MediaProvider, Sitecore.Kernel’]”/>

and ensure the setting “Preview Publishing target” is checked for the preview publishing target. This will ensure that the workflow items not in the final workflow can be published in the preview website and the querystring “sc_mode=preview” will ensure that you are viewing the item from preview database.

Capture

The Solution no 2:

Sitecore provides an out of box functionality to accomplish this.

You need to setup a “review” website with some proper filters so that you can review our changes before publish or even if your workflow items are not approved state.

“Review” site/mode is also called as “Live” Mode (purely meaning that you are not live but are viewing the site as if it is live.

In the review site the items are visible as soon as you save the item.

To your ‘<Sites>’  config uration  section add a review site

<site name=”preview_website” hostName=”preview.website.com” virtualFolder=”/” physicalFolder=”/” rootPath=”/sitecore/content” startItem=”/home” database=”master” domain=”extranet” allowDebug=”true” cacheHtml=”true” htmlCacheSize=”10MB” registryCacheSize=”0″ viewStateCacheSize=”0″ xslCacheSize=”5MB” filteredItemsCacheSize=”2MB” enablePreview=”true” enableWebEdit=”true” enableDebugger=”true” disableClientData=”false” filterItems=”false” enableWorkflow=”true” />

database=”master” will ensure that the contents are loaded from master website

filterItems=”false” will ensure that’s items are not filtered

enableWorkflow=”true” will ensure that it will manage workflow items too.

Any caveats:

Yes this functionality comes up with following restrictions or a caveat

  • It will display only “publishable” items. ( I will not call it as a caveat as the site respects any publishing restrictions including workflow status, item and version visibility)
  • Caching Implications/Restrictions – the live site can’t cache rendering outputs and controls. So you need to clear up the cache as you view the site and

any search indexes pointing to web might not work.

How to fix the following rendering errors on saving an item

How to fix the following rendering errors on saving an item

  • “The item contains broken links in these fields: – _Renderings
  • or “The item contains broken links in these fields: – _Final Renderings

Source of error:

  • The error happens because in the presentation details of the item some control has an invalid data-source or has a missing place holder settings
  • Especially if you are not watching the item in Raw Mode and still you see a Raw GUID for the data source or place holder then that is exactly the issue.

How to fix it:

  • First of all open the item’s presentation details by clicking the “presentation” tab on the ribbon and then click on “Details” button to open the layout details.
  • Click the shared/final layout as the case may be and then “edit” link to edit the layout.

pic 01 - layout details

  • Now select controls one by one and press “edit” to check if which control has a messed up data source or placeholder setting.

pic 02 - edit layout details

  • See, that for the header control, the field Order Link is showing a GUID data source although we are not viewing it in raw mode. Simply press “Clear” and use “Insert Link” or other options there to update the link and save . You are good to go.

pic 03 - clear and update datasource

Adding a custom button to the ribbon in Sitecore Ribbon/Tab


Please follow the steps below to add a button (E.g. a button which calculates Time based on the Time zone with respect to the server time zone).

Step 1: First login to the CMS instance using admin privileges and select the core database.

db selector

The Sitecore Ribbon is made up of 3 things – Ribbon, Strip and Chunk.

  • The Ribbon looks like a tool bar.
  • The Strip looks like a section on the Ribbon.
  • The Chunk looks like the button on the Strip.

whats is this

Step 2:  Go to “/sitecore/content/Applications/Content Editor/Ribbons/Chunks” using content editor and create a chunk called “Calculate Time” . Set the Header and ID for the chunk.

create chunk

Step 3:  Go to “/sitecore/content/Applications/Content Editor/Ribbons/Strips” using content editor and create a strip called “Calculate Time”  inside Publish Strip and set the Reference field to the path to the “Calculate Time”  chunk.

create strip

Step 4:  Go to “/sitecore/content/Applications/Content Editor/Ribbons/Chunks/Calculate Time” using content editor and create a button called “Calculate Time”  inside strip and set the header , Icon and  click fields

create button

Step 5:  Open “Commands.config” and add a command as highlighted.

commands config

Step 6:  Now create a web page and name it ‘CalculateTime’. (The name space can be ‘CustomButtons.Core.Sitecore.Shell.Framework.Commands.CalculateTime’). Create a calendar to select date a drop down to select time and time zone and the supporting code behind to display the converted time based on time zone. And there you go.

Code Behind 1 and 2 and UI:

UI

code behind 2

code behind 1

Output: Select date, time and time zone and press “calculate”.

Output


Hope you liked the explanation.

Publishing Target missing Issue while publishing content

You might have experienced this issue where the publishing target is missing while publishing the content as below.

Capture

There is a very easy solution to this issue – grant a language:read permission to “/sitecore/system/Languages/en” for the base/root user so that all users can get this access.

Capture2

Hope this works for you too.


How to move and rename Items from Source to Destination path in Sitecore using Sitecore PowerShell

Here is the simple script for this:

# database name

$db = “master:”

# source path

$sourcePath = “/sitecore/content/Generic Content/Generic Pages/Basic Generic Item”

# destination path – task was to move the generic pages from generic location to country based locations

$destinationPath = “/sitecore/content/USA/Generic Content/Generic Pages/Basic Generic Item”

$itemsList = Get-ChildItem -recurse -Path ($db + $sourcePath) | Where { $_.TemplateName -eq “Generic Pages” }

$itemsList | ForEach-Object {

# task was to append parent name to the new item

$newName = $_.Name + “-” + $_.Parent.Name

if(![string]::IsNullOrEmpty($newName)){

Move-Item -Path $_.ProviderPath -Destination ($db + $destinationPath + “/” +                    $newName)

Write-Host “Moved Item: ” $newName  ” to path: ” ($db + $destinationPath)

}else{

Write-Host “Could not move Item: ” $newName

}

}

How to handle and configure Sitecore Launch Pad Buttons, sections, sort order and grouping

Please have a look at the Sitecore Launch pad with lots of buttons.

These buttons can be configured to show and hide based on users and roles.

Lets take an example and say that we have a role – configmanger which is responsible for managing lot of configurable items including this launch pad.

Capture

First of all switch to CORE database and go to this location – /sitecore/client/Applications/Launch Pad/PageSettings/Buttons

You can add new buttons here and also control the grouping and order of the buttons and the link which will open on clicking the button.

E.g. Suppose if you want to show 2 separate buttons to show English and French Content you can create 2 buttons in the location – /sitecore/client/Applications/Launchpad/PageSettings/Buttons/ContentEditing

Name these 2 buttons as English Content and French Content and set their title, link properties to define the title and the link where it will go to when clicked.

capture 2

Also do not forget to assign a READ permission to the 2 buttons paths for the role – configmanager.

capture 3

Now you can see 2 additional buttons on Launch pad in Content Editing sections.

capture 4

If you want to remove these 2 buttons simply revoke – configmanager roles permission on these 2 button paths. See below both buttons are missing now.

capture 5

Hope this article helps you in configuring the launch pad.

Get Rid of Extra HTML Tags(e.g p tags etc) from the Rich Text Editor while saving

Method 1: Override and disable the filters as needed

Step 1: Update the following config setting:

<settings xmlns:patch=”http://www.sitecore.net/xmlconfig/”&gt;

<setting name=”HtmlEditor.DefaultConfigurationType“>

<patch:attribute name=”value”>YourProject.Custom.Controls.CustomRichTextEditor, YourProjectDLLName </patch:attribute>

</setting>

</settings>


Step 2: Override Sitecore.Shell.Controls.RichTextEditor.EditorConfiguration as below:

using Sitecore.Data.Items;

using Telerik.Web.UI;

namespace YourProject.Custom.Controls

{

public class CustomRichTextEditor : Sitecore.Shell.Controls.RichTextEditor.EditorConfiguration

{

public CustomRichTextEditor(Item profile)

: base(profile)

{

}


protected override void SetupEditor()

{

base.SetupEditor();

Editor.DisableFilter(EditorFilters.ConvertToXhtml);

Editor.EnableFilter(EditorFilters.IndentHTMLContent);

Editor.StripFormattingOptions = EditorStripFormattingOptions.MSWordRemoveAll

| EditorStripFormattingOptions.ConvertWordLists

| EditorStripFormattingOptions.Css

| EditorStripFormattingOptions.Font

| EditorStripFormattingOptions.Span;

Editor.NewLineMode = EditorNewLineModes.Br;

}

}

}


Method 2: Override and remove the tags as needed

Step 1: Update the following config setting:

<settings xmlns:patch=”http://www.sitecore.net/xmlconfig/”&gt;

<setting name=”HtmlEditor.DefaultConfigurationType“>

<patch:attribute name=”value”>YourProject.Custom.Pipelines.ProcessRichTextInParagraphOnRender, YourProjectDLLName </patch:attribute>

</setting>

</settings>

Step 2: Override Sitecore.Shell.Controls.RichTextEditor.EditorConfiguration as below:


namespace YourProject.Custom.Pipelines

{

public class ProcessRichTextInParagraphOnSave

{

public void Process(SaveRichTextContentArgs args)

{

if ((args.Content.Trim().StartsWith(“<p>”) && args.Content.Trim().EndsWith(“</p>”)))

args.Content = string result = Regex.Replace(HttpUtility.HtmlEncode(args.Content), @”</?p\b.*?>”,

String.Empty,RegexOptions.IgnoreCase);

}

}

}

A list of filters are listed in Telerik’s documentation – http://docs.telerik.com/devtools/aspnet-ajax/controls/editor/managing-content/content-filters


Compare Sitecore Vs Solr Items

Have you ever faced any urgent Production issue where your deployment succeeded and site is working fine and then you come to know that the number of items in the Solr and Sitecore don’t match and you also want to see the delta of those differences. You can also use this information to setup a threshold to setup alerts if the mismatch of items surpasses a defined limit(I used Amazon’s SNS(Simple Notification Service) to notify via email and text to the Production SWAT team as soon as threshold passed the limit)

This Powershell script will be very handy for you. The base idea is that you get detaisl of items from your Sitecore master and web database and also Solr master and web databases. Once you have these JSONs in hand comparing those objects would not be that difficult. Just filter out the columns you need and you are good to go.

//First Get Items From Sitecore Master Database
$childsMaster = Get-ChildItem master:/sitecore/content/../Products -Language * -Version *
write-host “Count of items Product Catalog(Master): ” $childsMaster.length

//Then Get Items From Sitecore Web Database
$childsWeb = Get-ChildItem web:/sitecore/content/../Products -Language * -Version *
write-host “Count of items Product Catalog(Web): ” $childsWeb.length

//Then Get Items From Sitecore Solr Master
$items_catalog_index_master = wget “http://search.intouch.usastg.mktest.com/solr/catalog_index_master/select?q=marketsku_s%3A*&fq=_language%3Aen-CA&rows=9999&fl=marketsku_s&wt=json&indent=true&#8221; | ConvertFrom-Json
write-host “Count of items catalog_index_master: ” $items_catalog_index_master.response.numfound
#$items_catalog_index_master.response.docs.marketsku_s

//Then Get Items From Sitecore Solr Slave
$items_catalog_index_web = wget “http://indexing.intouch.usastg.mktest.com/solr/catalog_index_web/select?q=marketsku_s%3A*&fq=_language%3Aen-CA&rows=9999&fl=marketsku_s&wt=json&indent=true&#8221; | ConvertFrom-Json

write-host “Count of items catalog_index_web: ” $items_catalog_index_web.response.numfound

#$items_catalog_index_web.response.docs.marketsku_s
write-host “Compare Sitecore Master Vs Web Databases”

Compare-Object $childsMaster $childsWeb -PassThru
write-host “Compare Sitecore Solr catalog_index_master Vs catalog_index_web”

Compare-Object ($items_catalog_index_master.response.docs.comparefieldname) ($items_catalog_index_web.response.docs.comparefieldname)

write-host “Compare Master Database Vs Solr catalog_index_web”
Compare-Object ($childsMaster.comparefieldname) ($items_catalog_index_web.response.docs.comparefieldname) -PassThru